Placing Orders
A step-by-step guide for each GroWrk order type is provided below. Please note that some order types may have multiple flows and entry points.
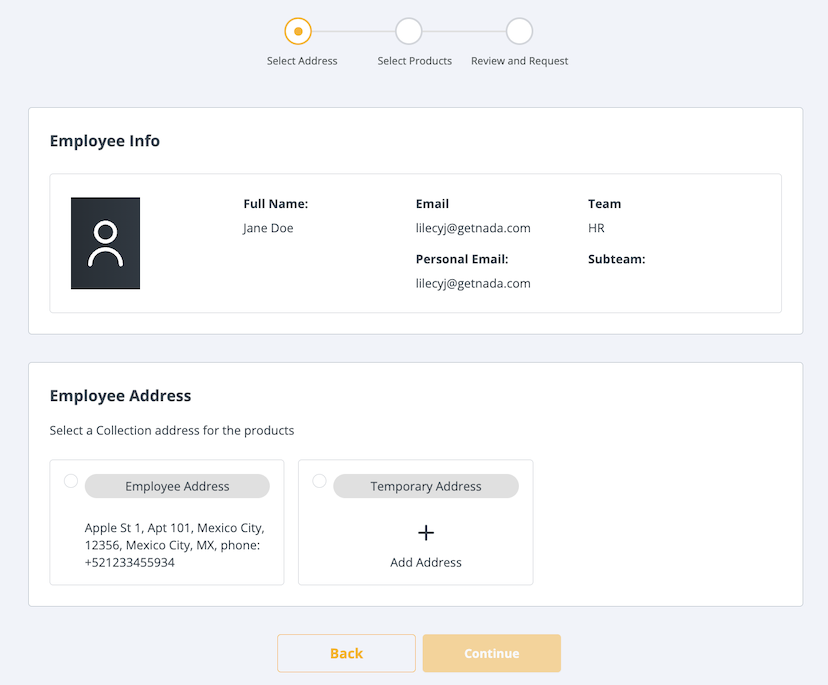
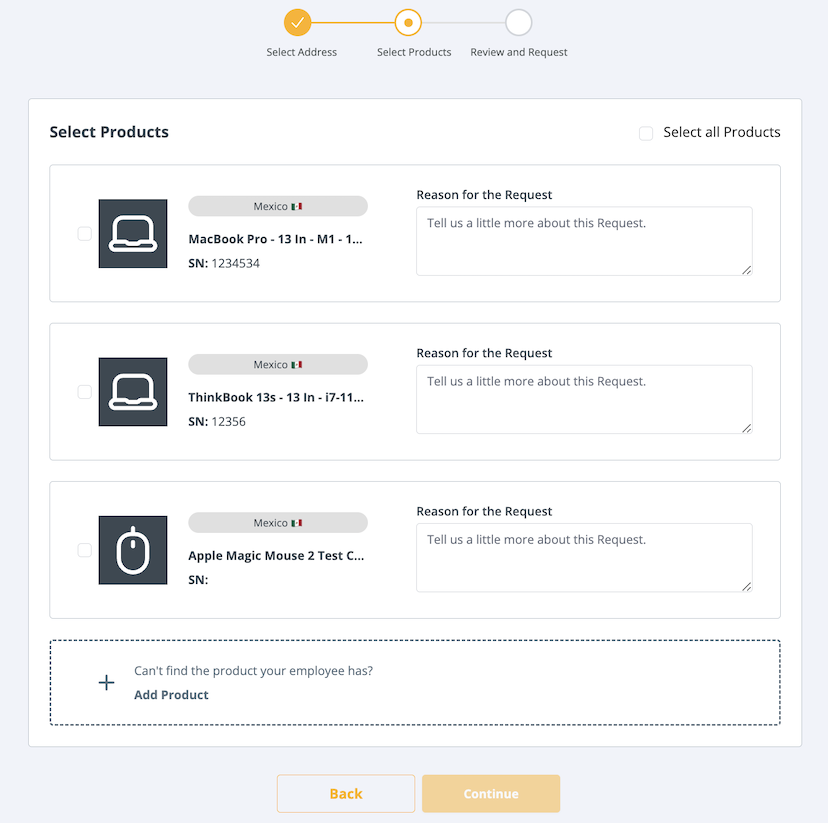
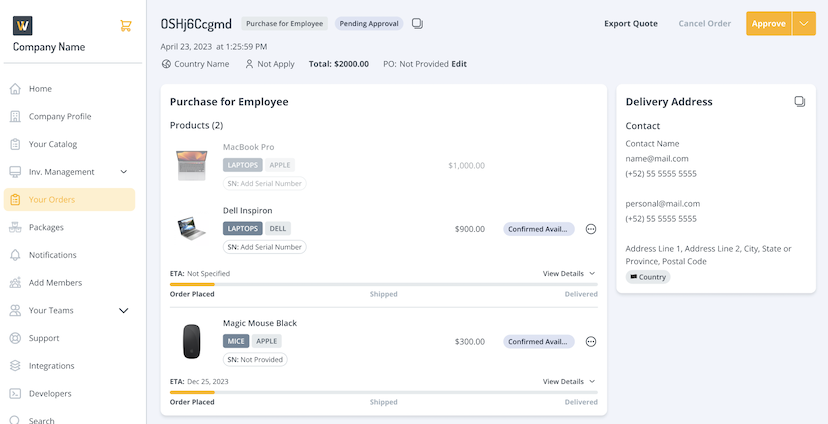
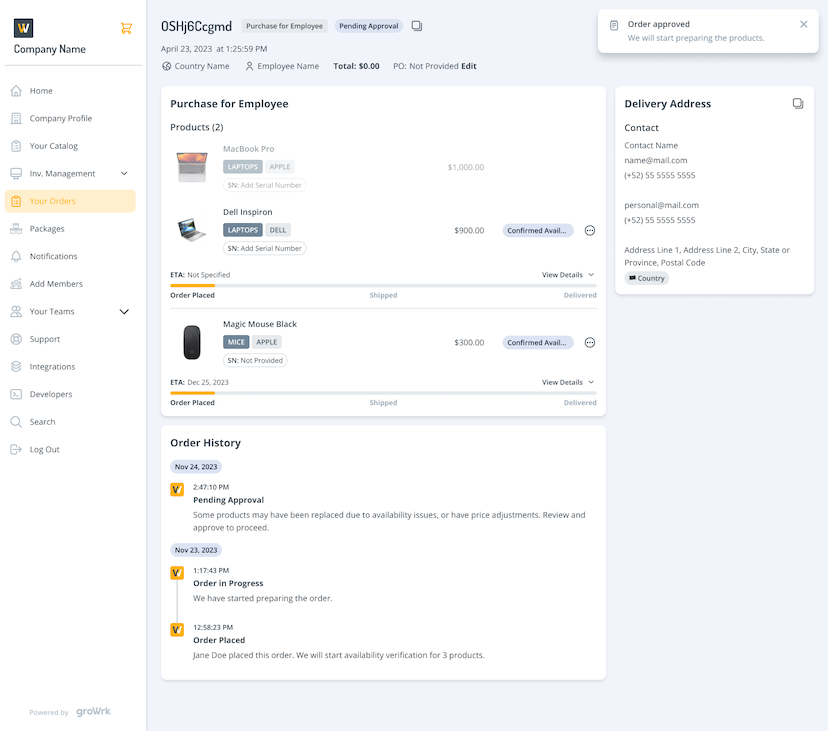
Purchase for Employee
Orders placed specifically for purchasing products for employees. Purchases will be delivered directly to the employee(s). Packages can also be purchased for employees.
- There are two ways to start your purchase. Select Purchase on your employee’s profile or on their profile view on Teams.
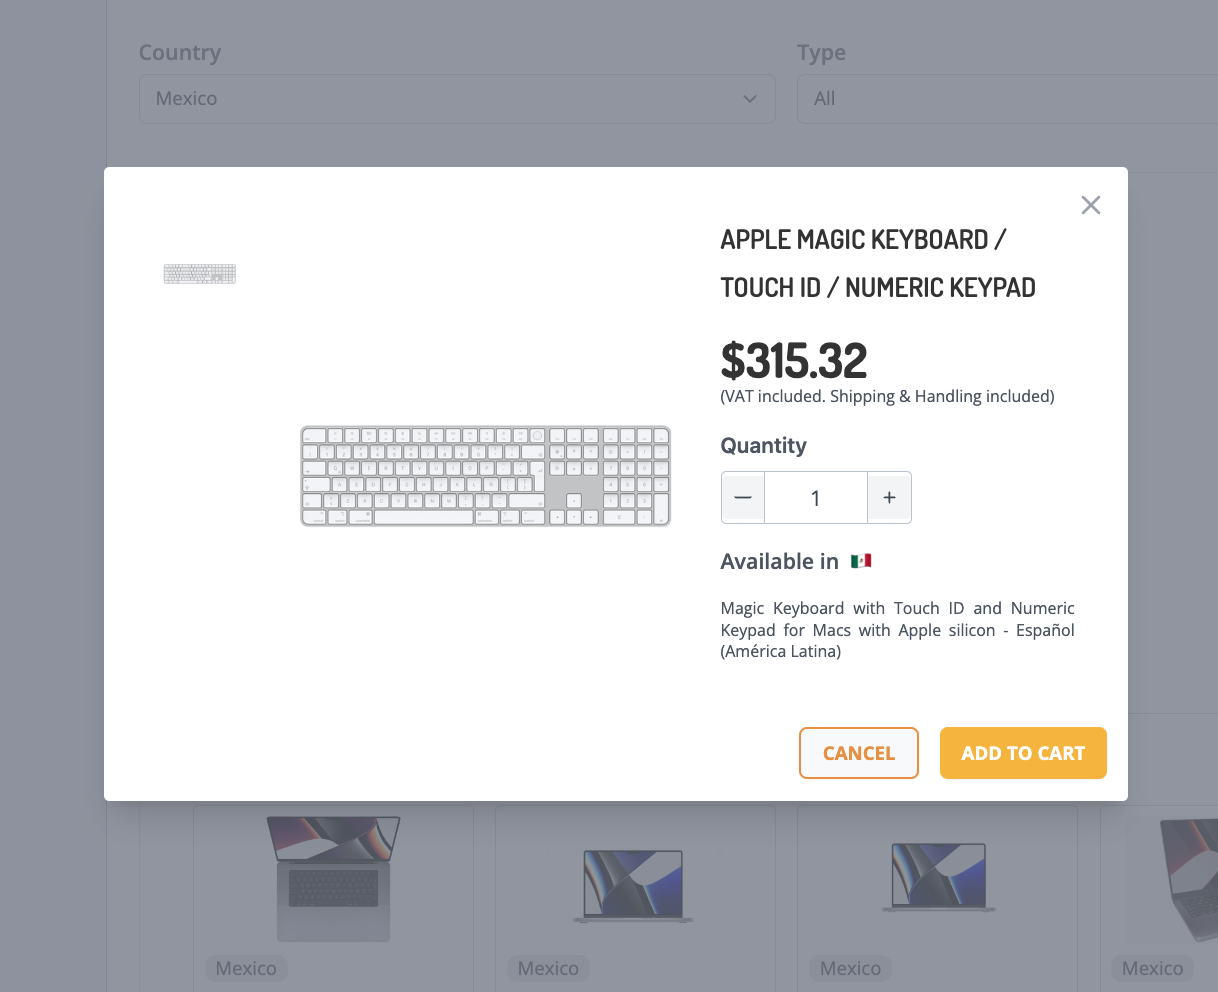
- The next page will show you the available products for purchase in the region the employee is located in. You can filter by the type of product.
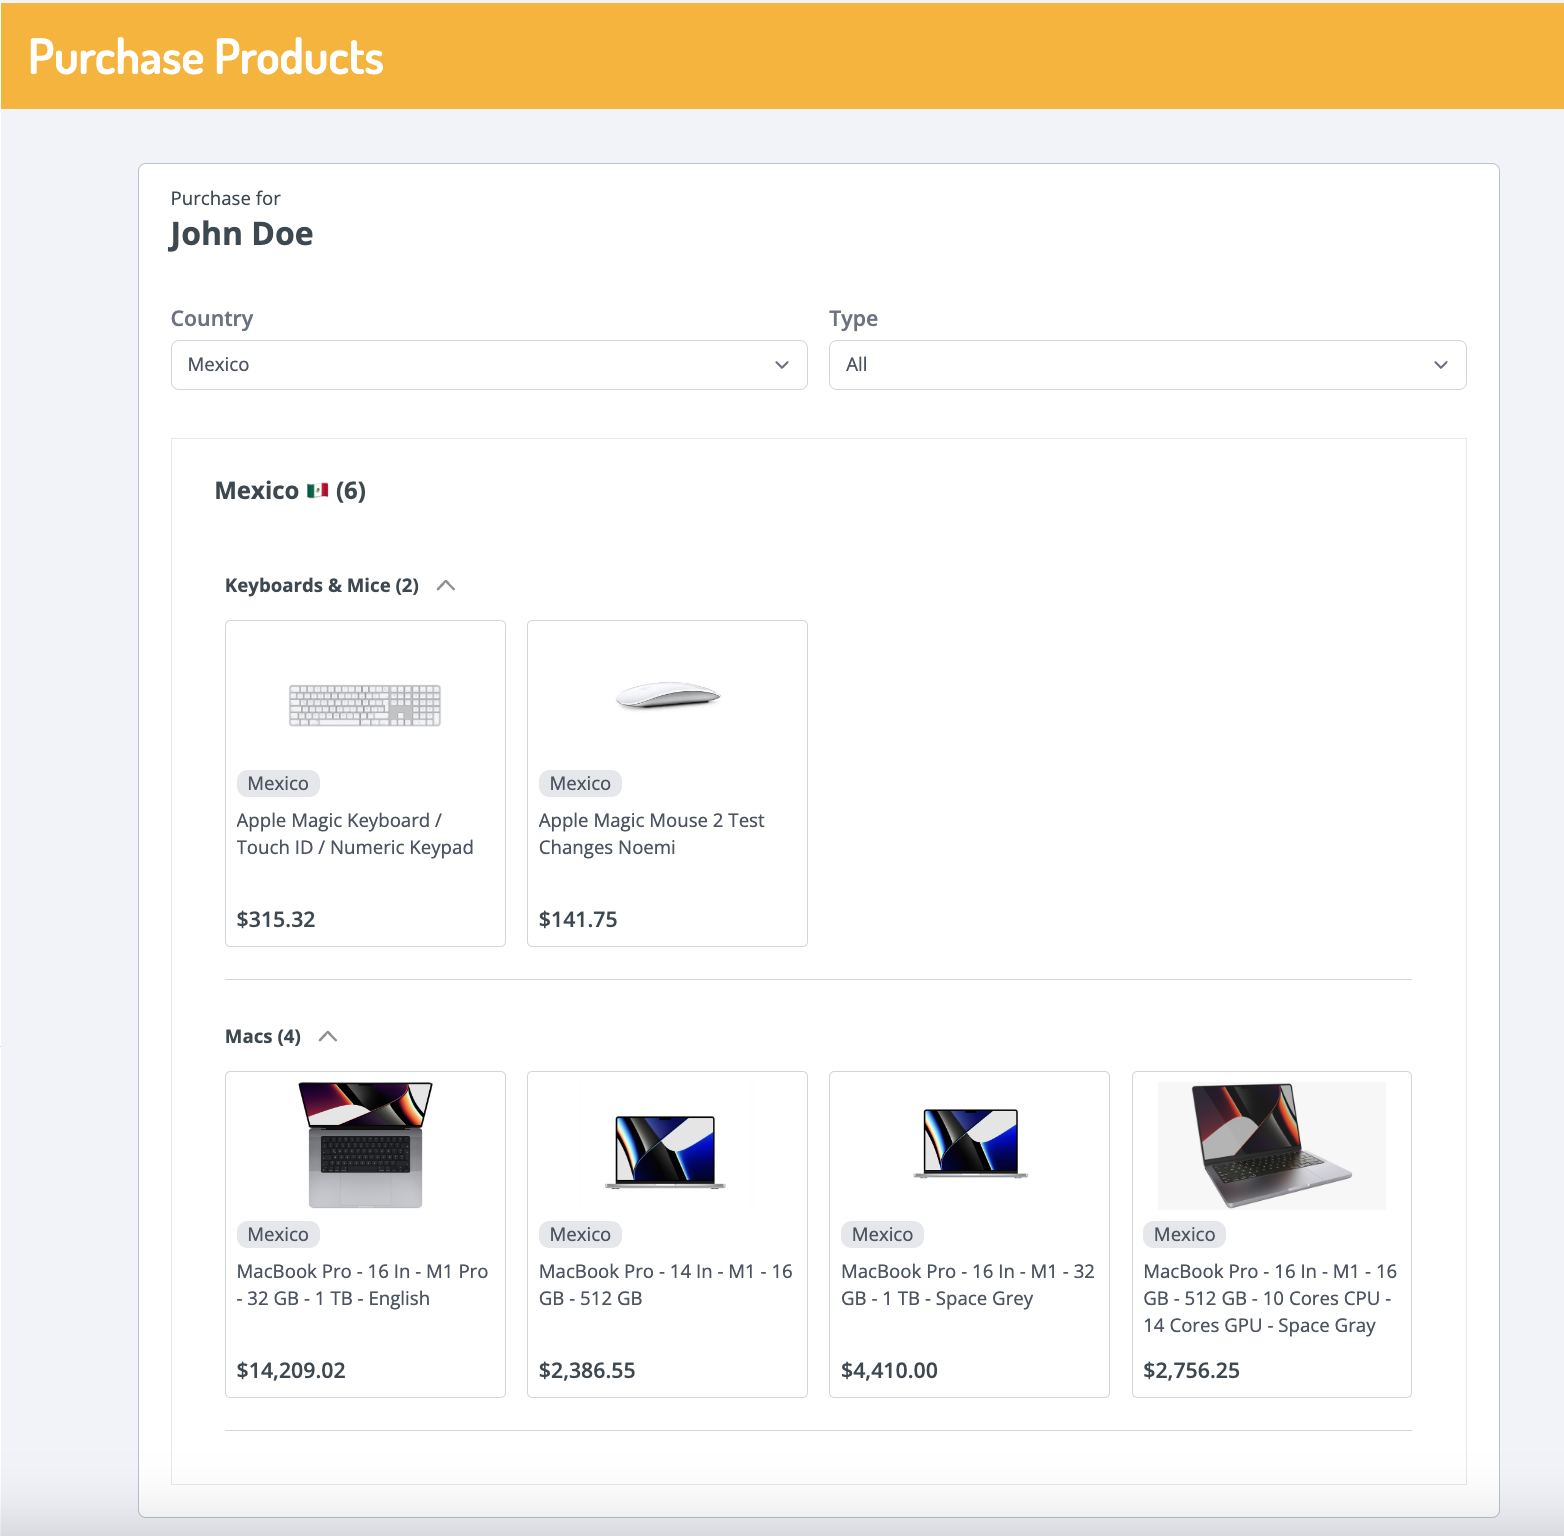
- Select the product you’d like to purchase for you employee. A pop-up with pricing and description will show. Click on ADD TO CART.
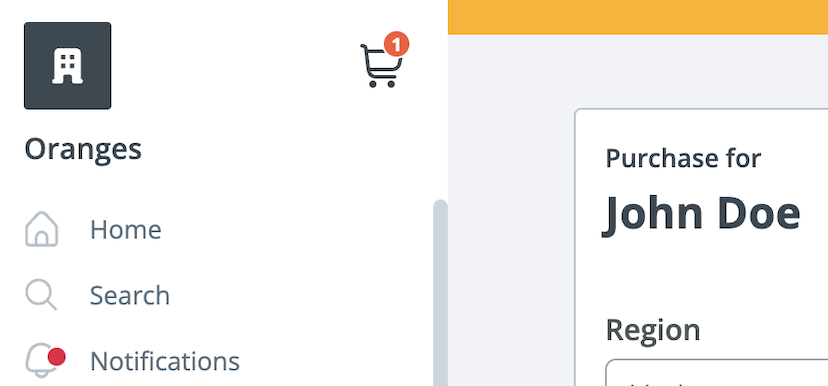
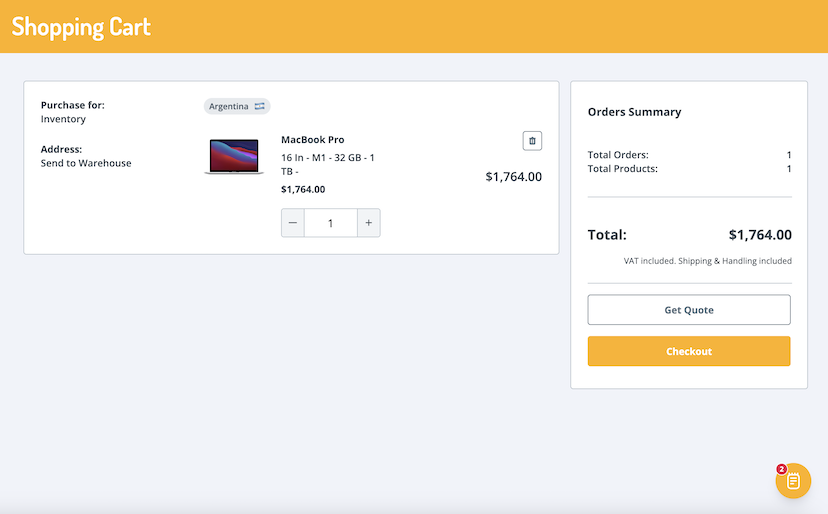
- Click on the shopping cart icon at the top left of your screen, next to your company name.
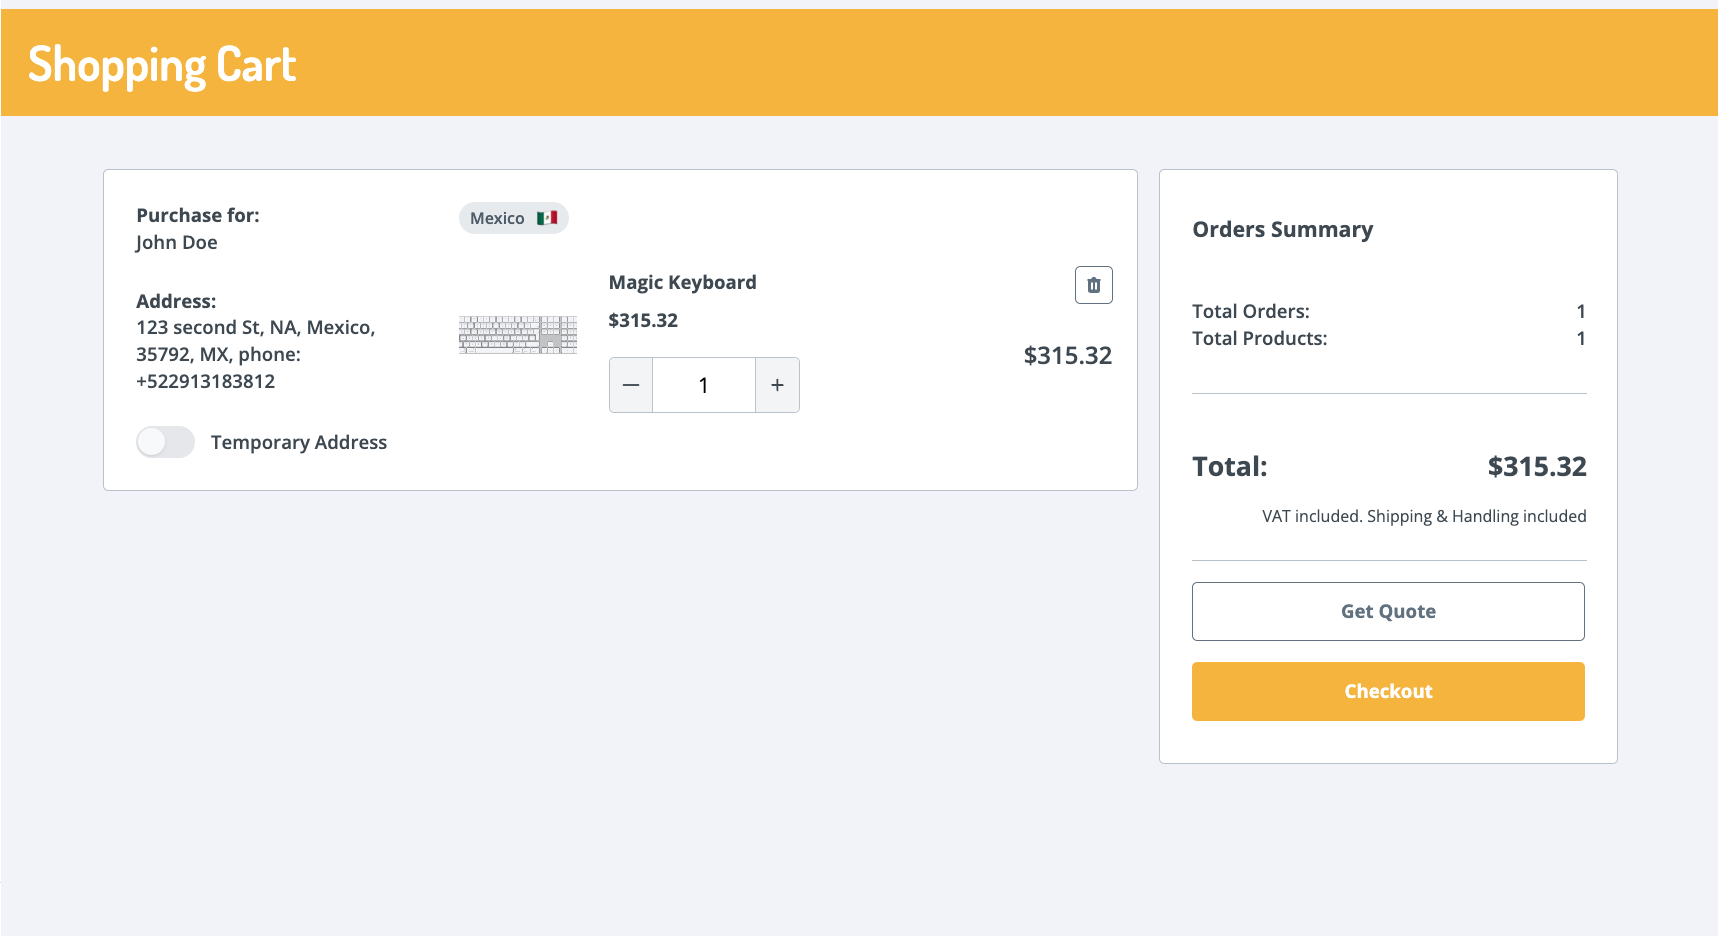
- Review your cart and click Checkout.
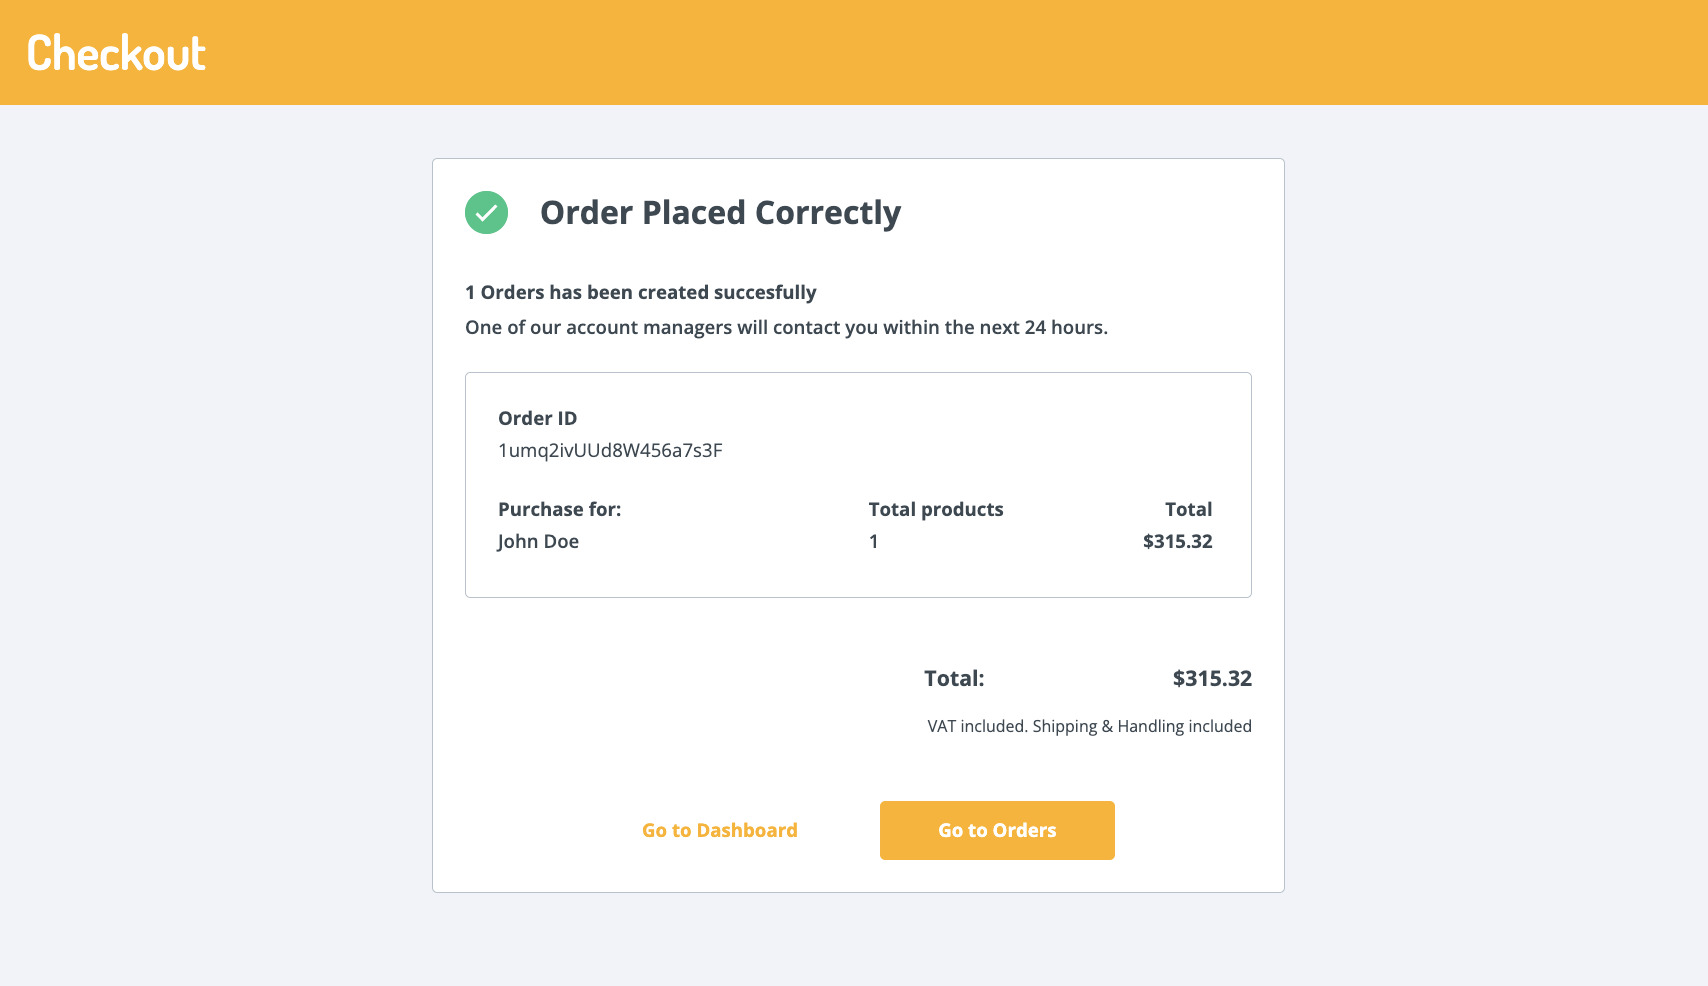
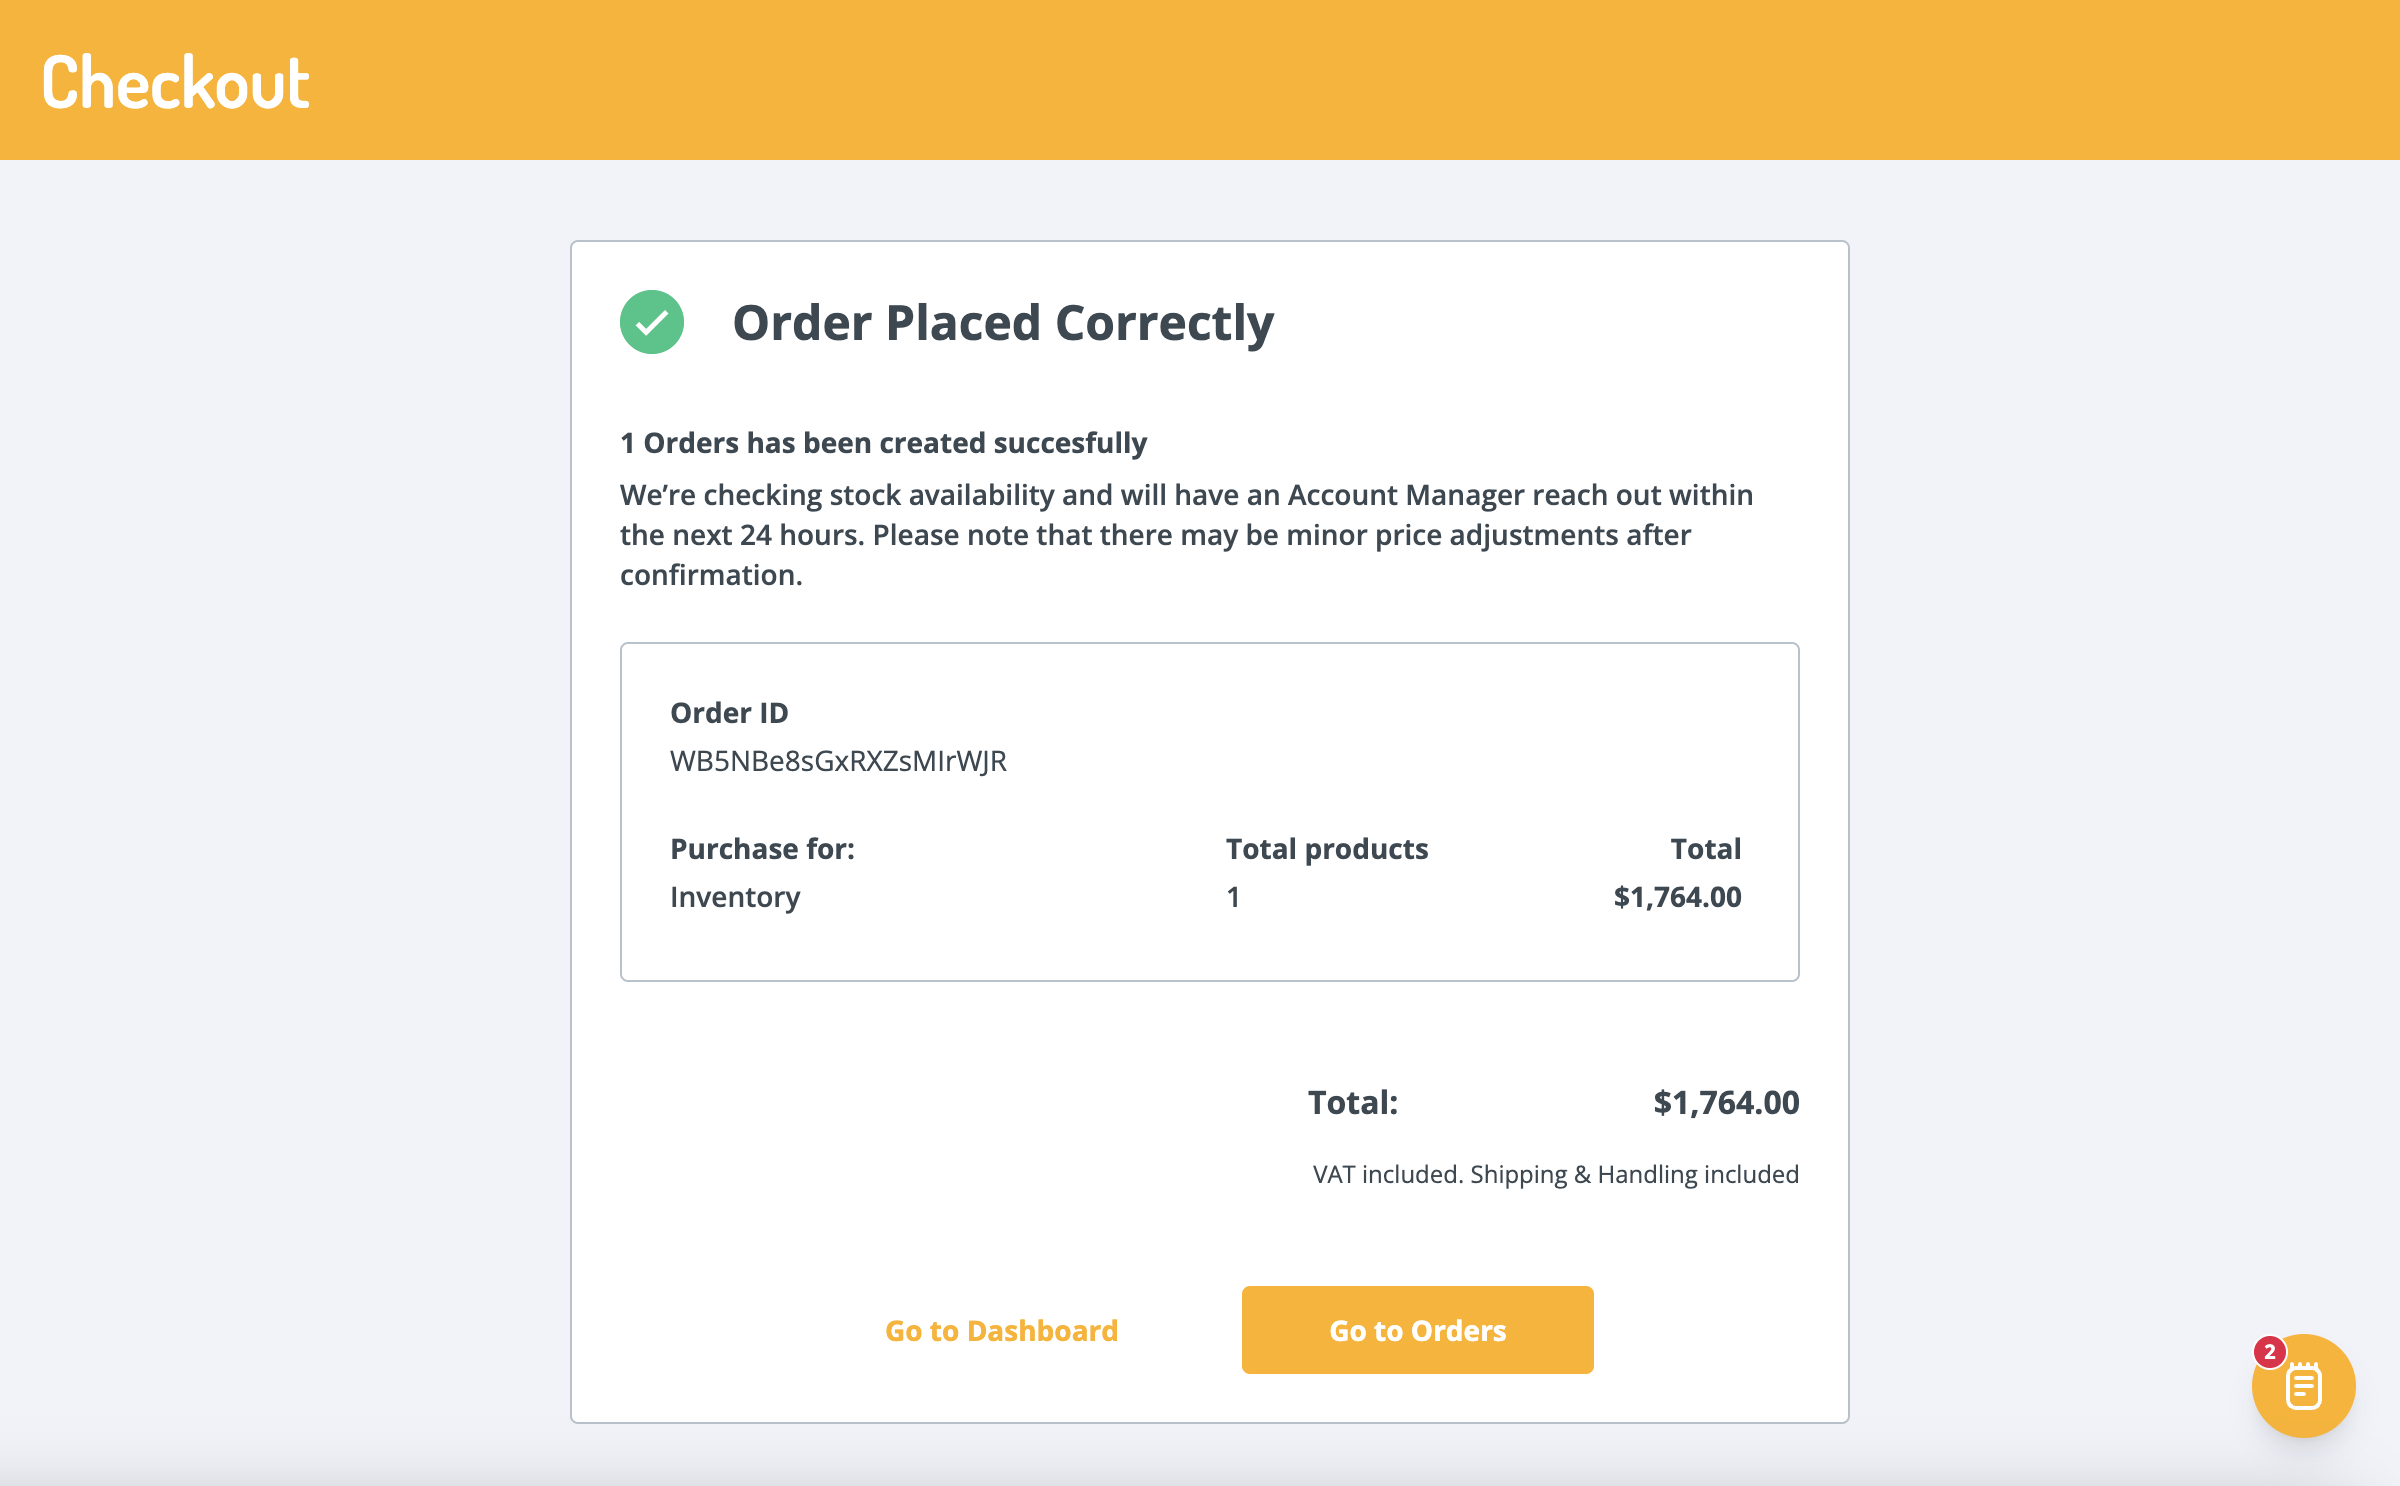
- You’ll be led to a confirmation page saying that your order has been placed.
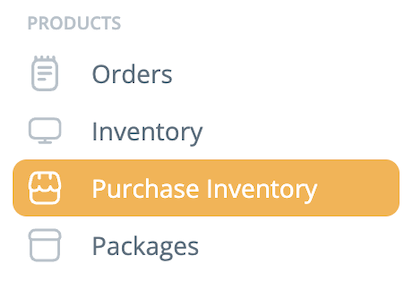
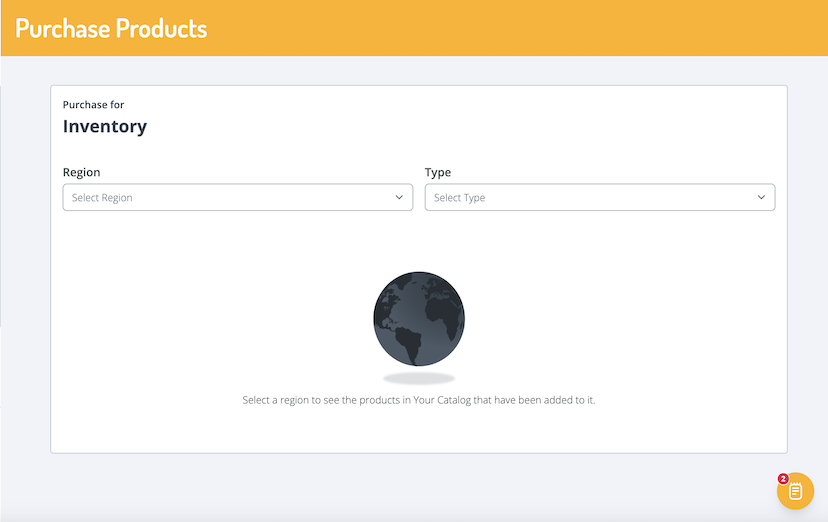
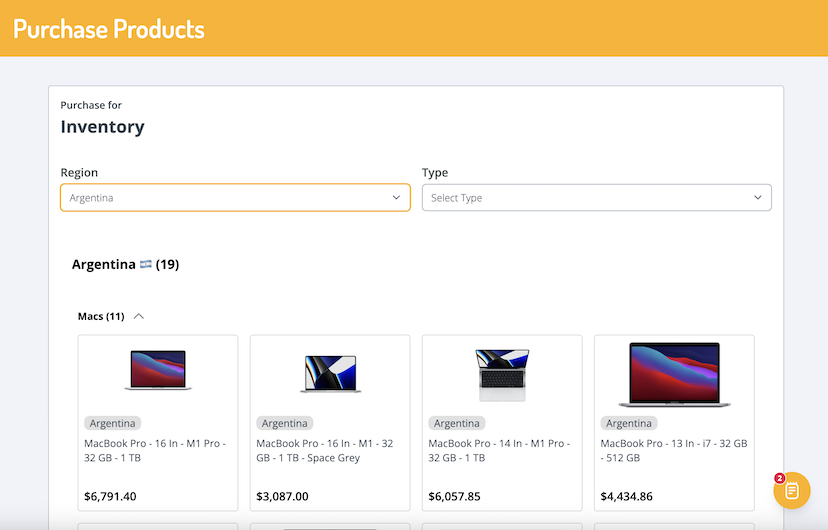
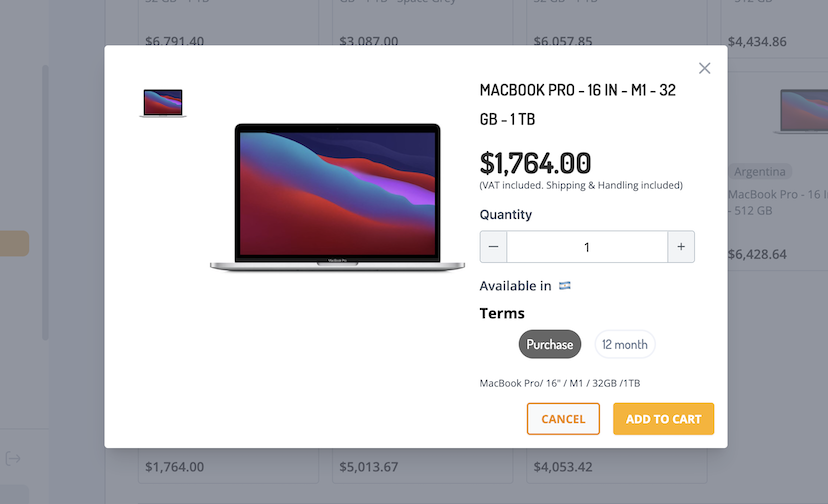
Purchase for Inventory
Order placed to purchase and update stock in a company’s inventory. Packages can also be purchased for your inventory to have in stock to assign to employees later on.
- Select the Purchase Inventory tab in the navigation bar, or the Purchase button in the Inventory tab.
- Select a region and type of product you would like to order.
- You’ll be shown a catalog of the available product type you selected in the region you’d like to order for. If a type was not selected, the results will show all products that are available to be purchased in that region.
- Select the product you’d like to purchase. A pop-up will appear and will show product details. To add to your cart, click Add Product.
- Click the shopping cart icon to take you to the checkout page. Review your order and click Checkout.
- You will be notified that your order has been placed and the Account Manager will be in contact for more details.
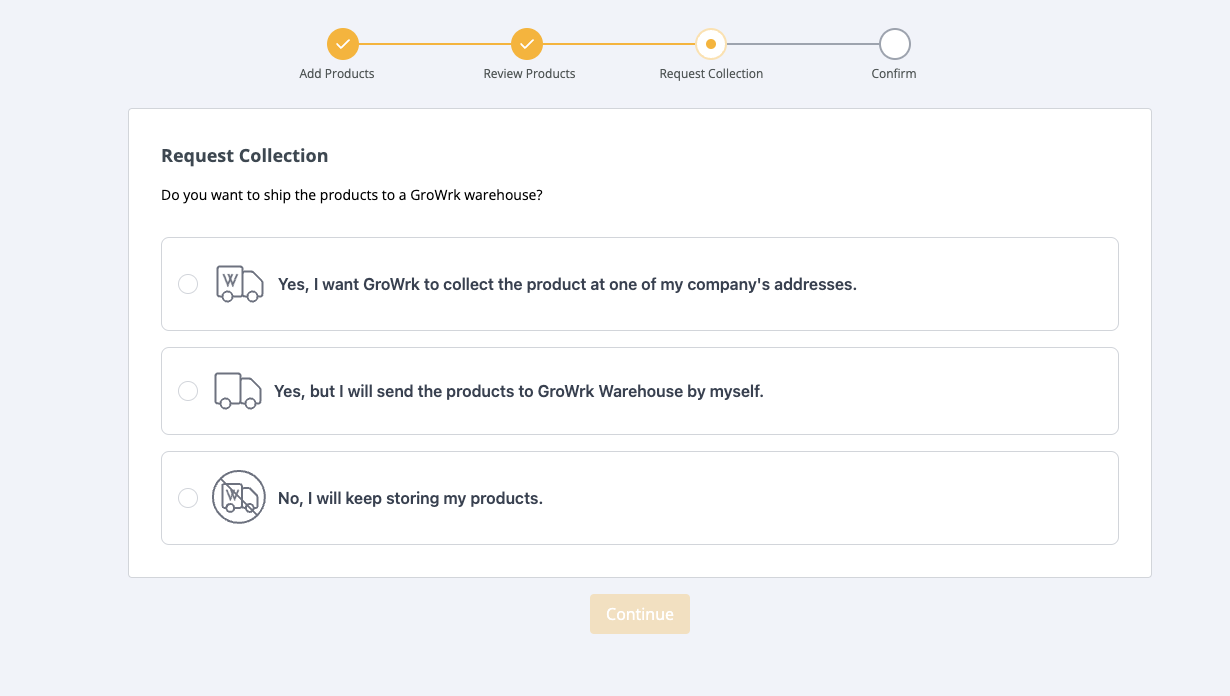
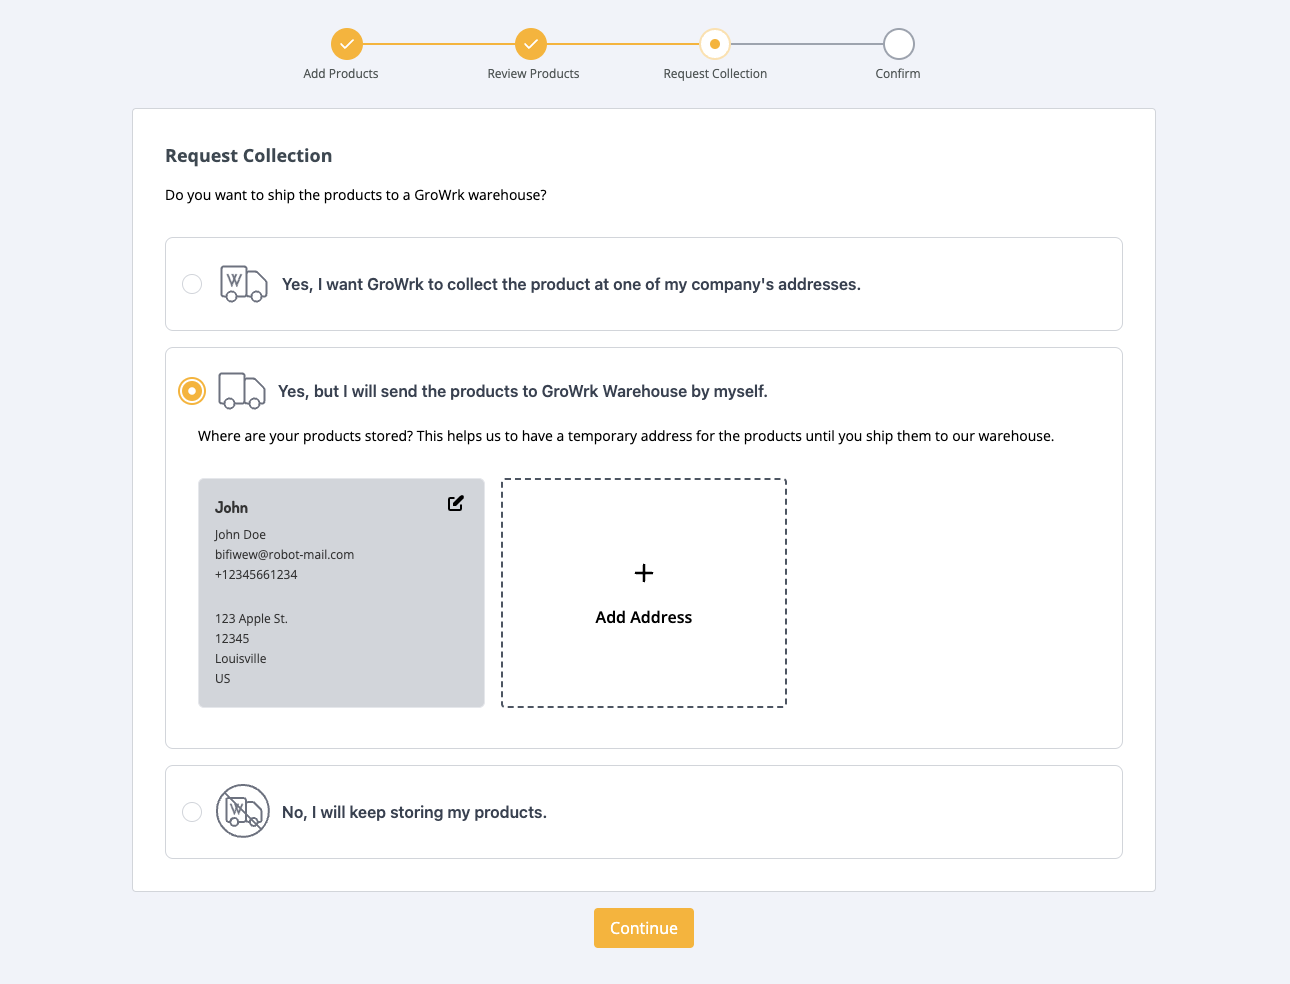
Upload to Inventory
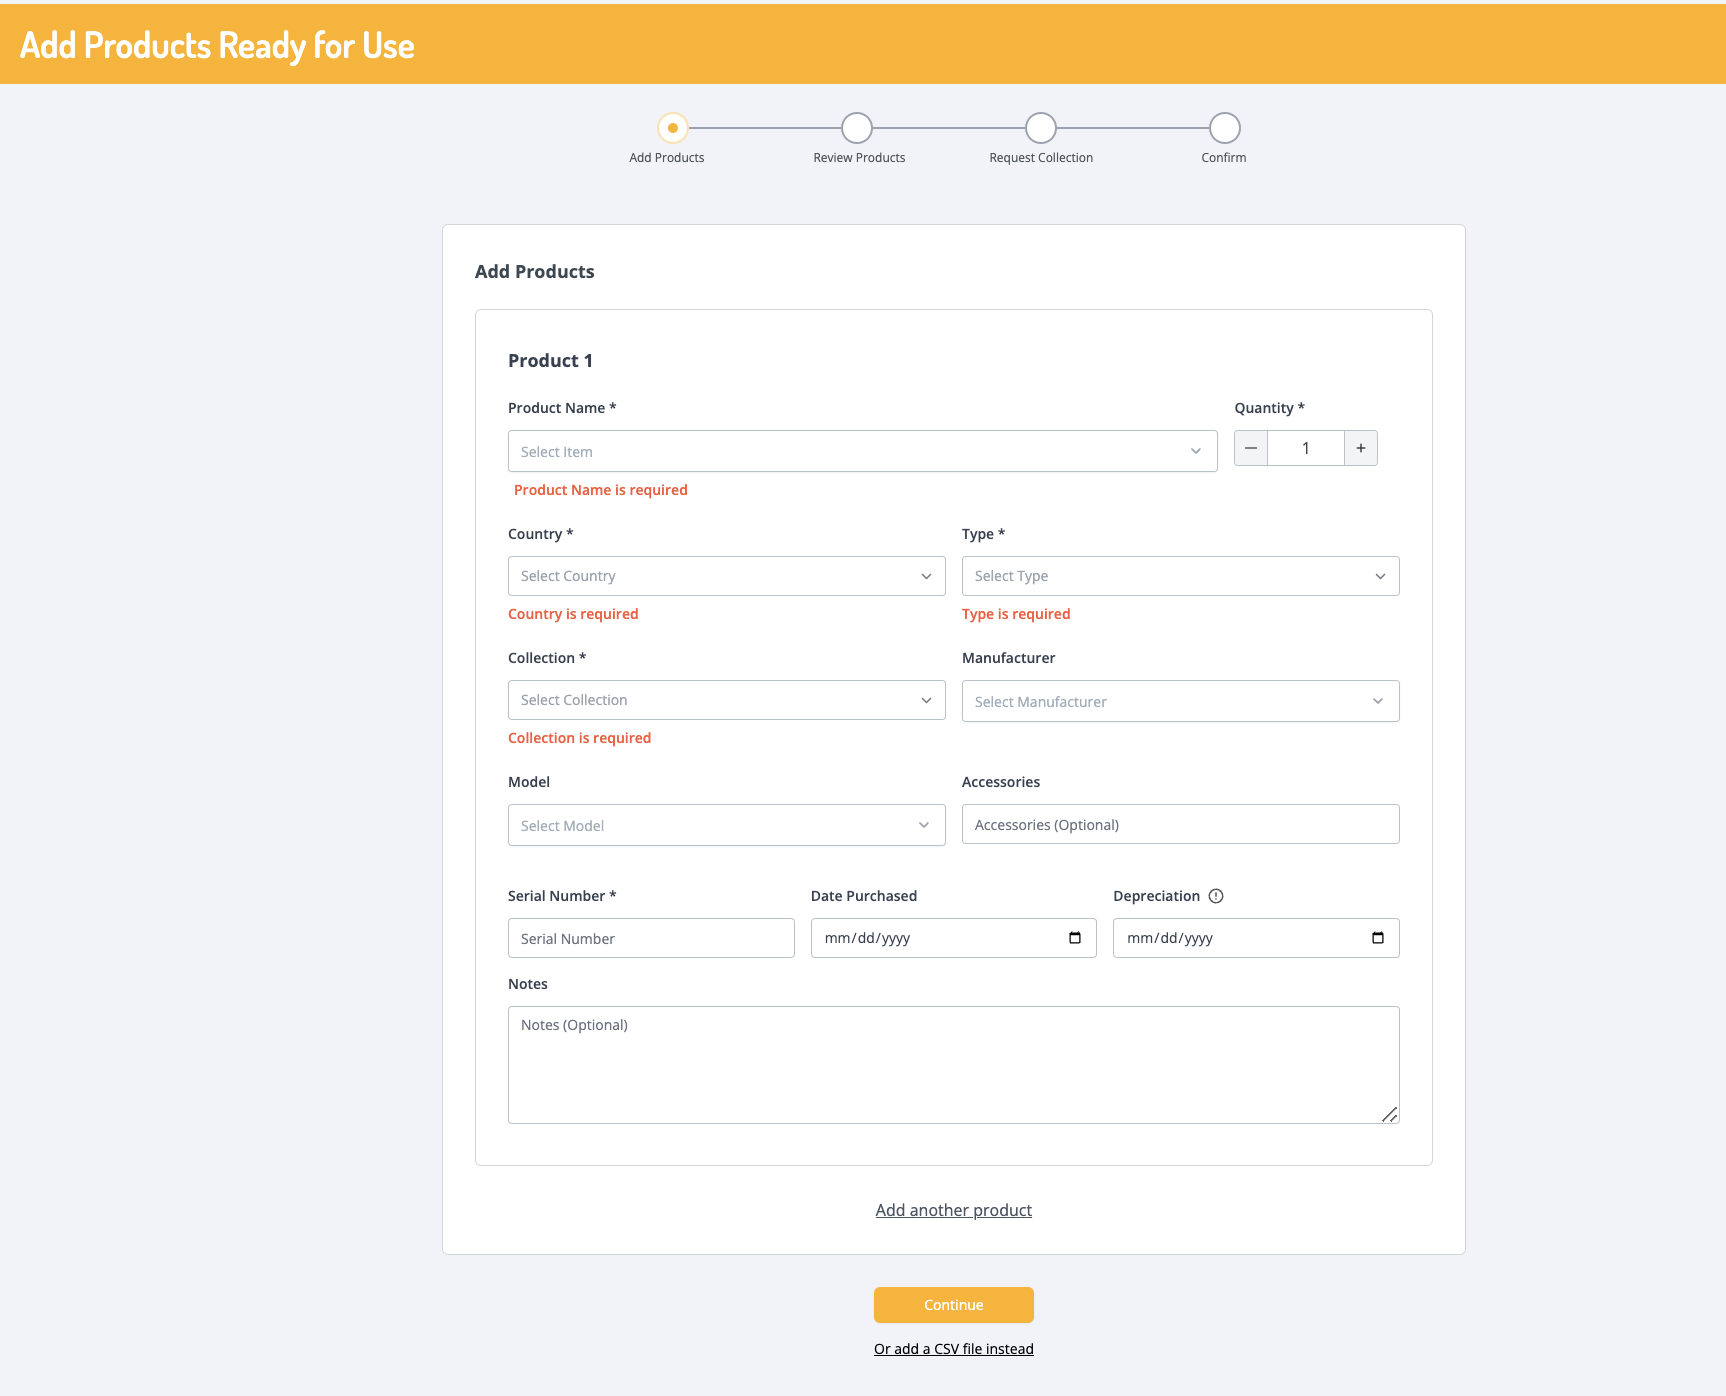
When uploading existing inventory information to your Dashboard, a collection order can be placed if products need to be stored by GroWrk.
- Upload a CSV file or manually input product details. Be sure to follow CSV formatting using this template.
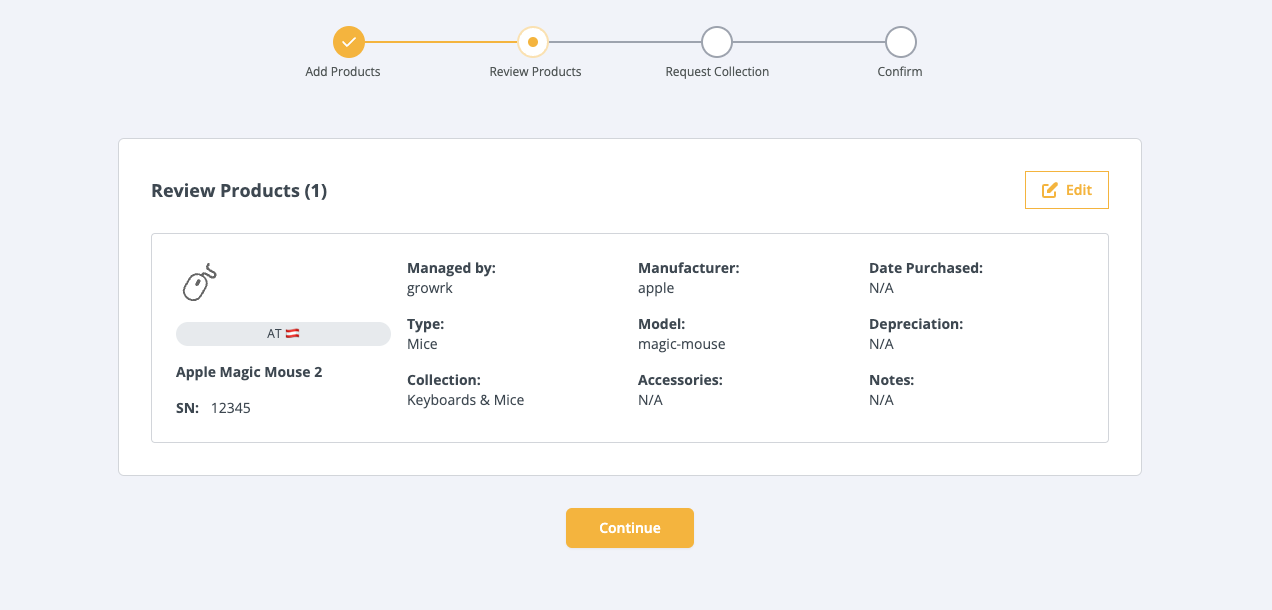
- Review the details of the products you’d like to collect. Click Continue.
- Select if you would like GroWrk to store your uploaded products or if you’ll be keeping them. Collection orders will only be made if you wish for your products to be stored at our warehouses. Click Continue.

- Review the products that will be be stored in the GroWrk warehouse. Click Confirm.
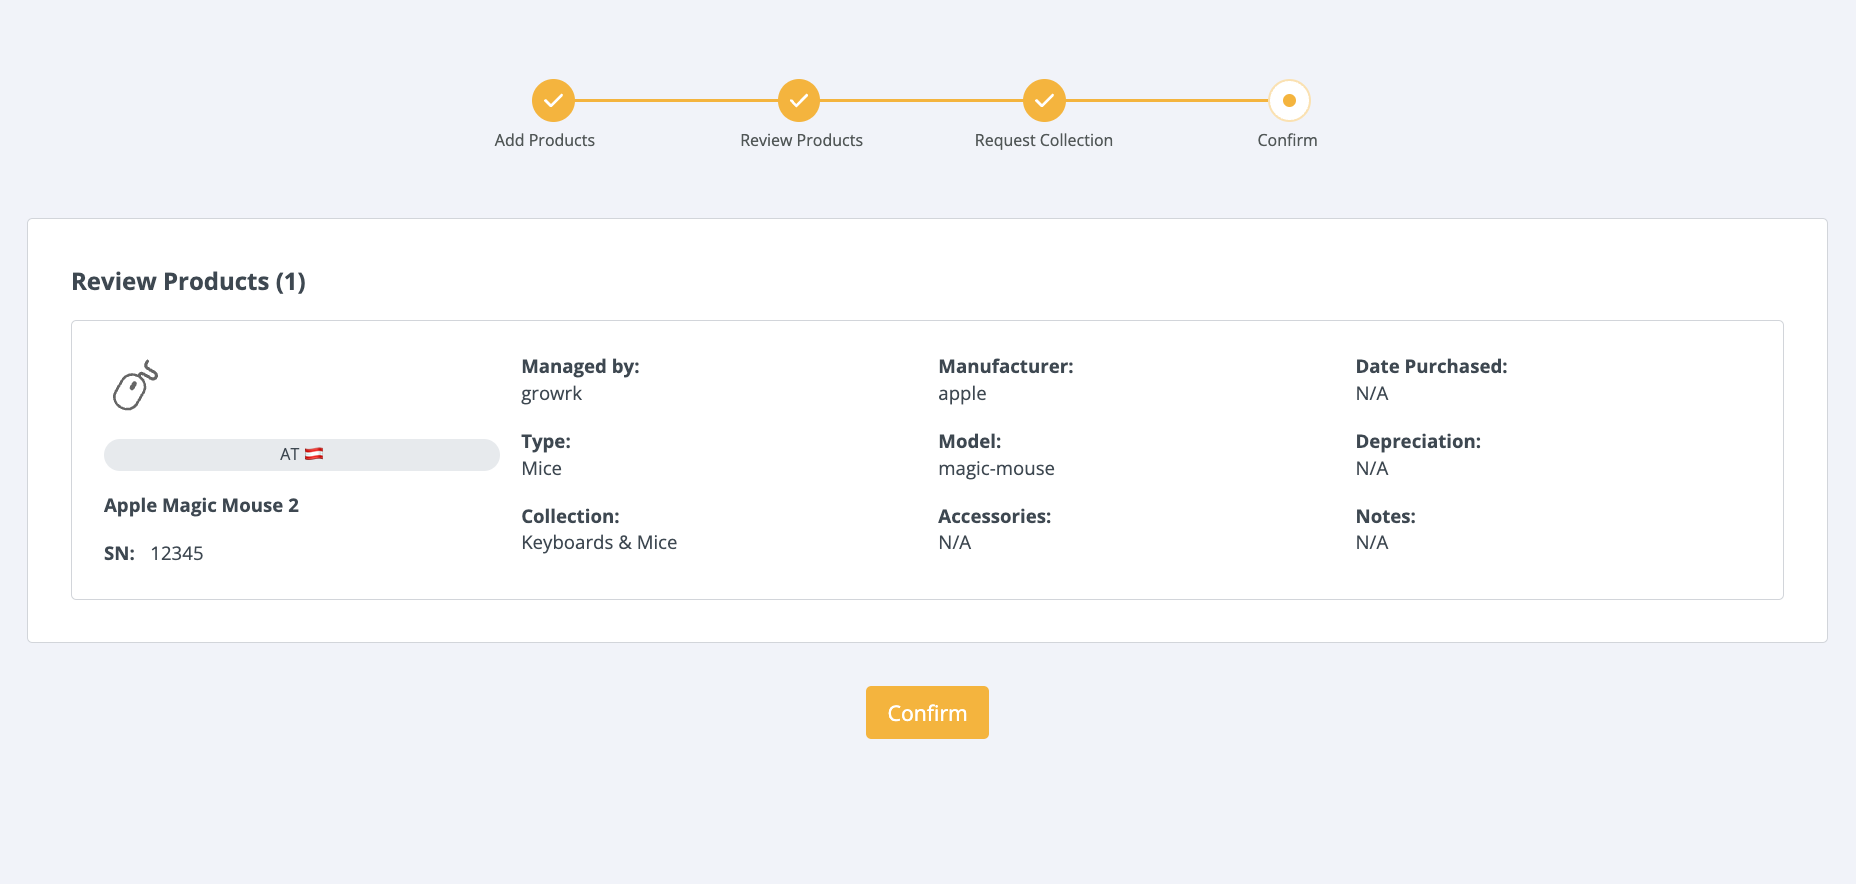
- You will be notified that your order has been confirmed. An Account Manager will review and contact you for the next steps.

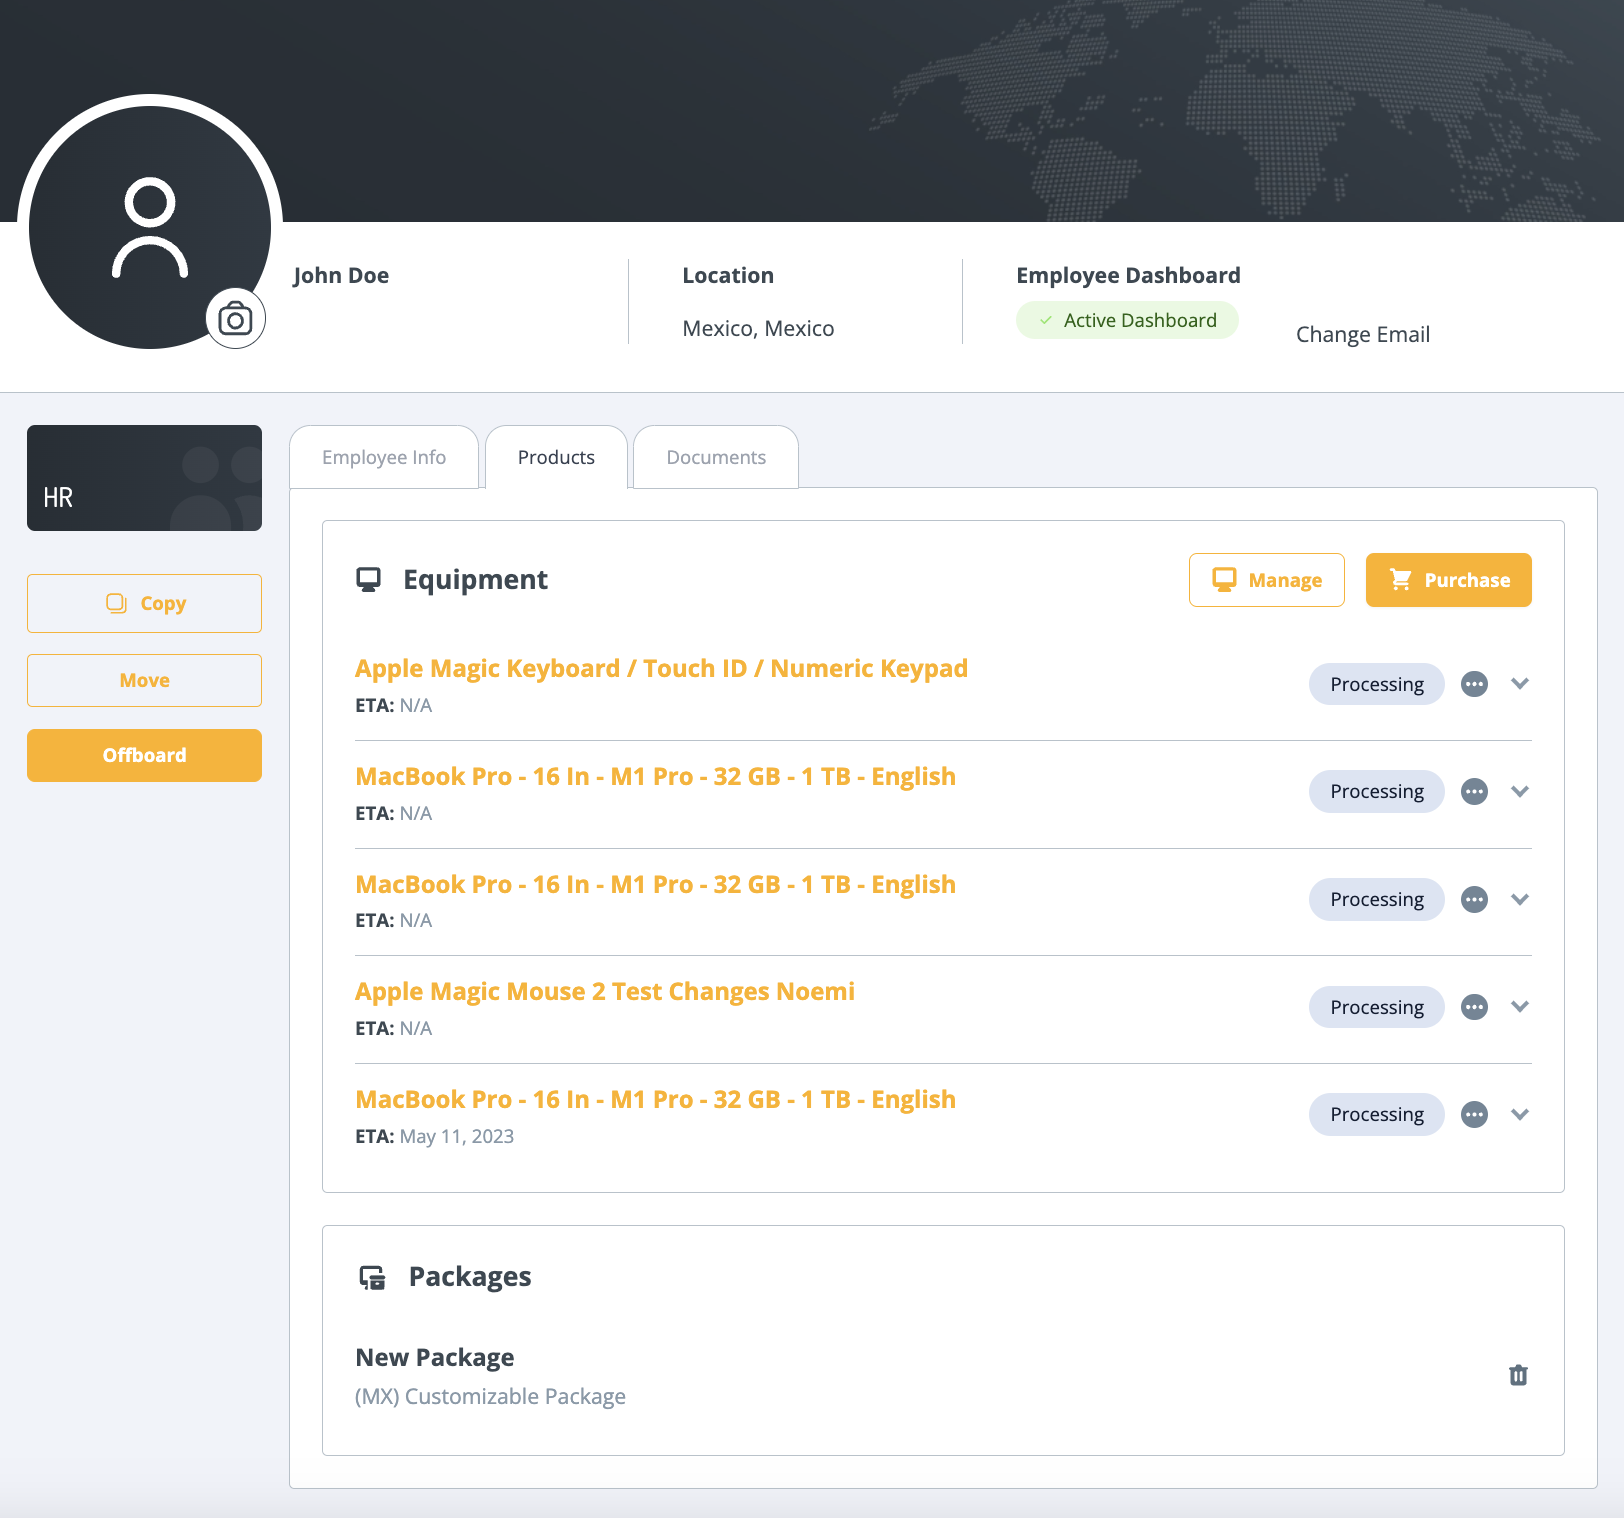
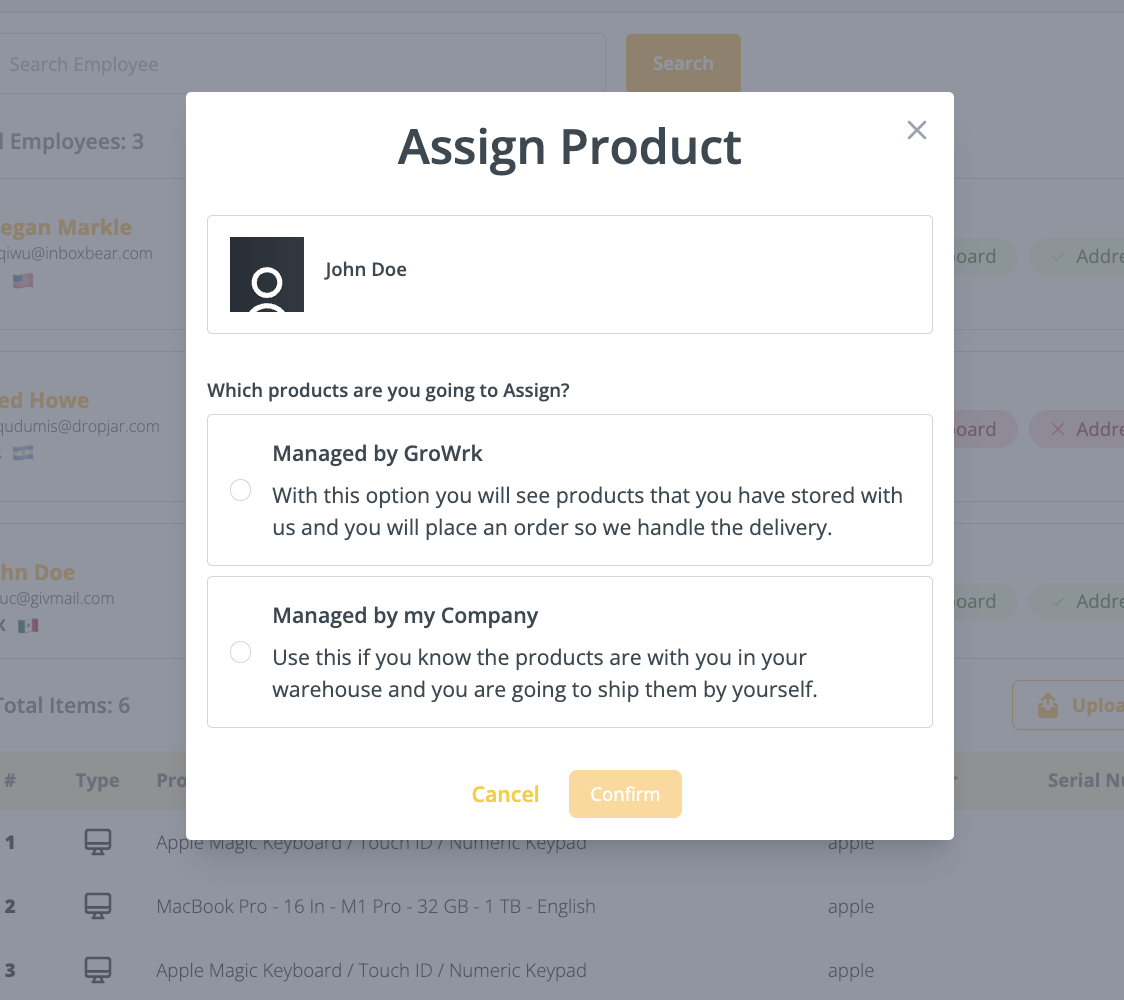
Assign to Employee
This is an order to deliver assigned products to an employee from your company’s existing inventory pool.
Assign to Employee through Employees and Teams
- On the employee’s profile , click Manage and then Assign Product. or On the employee’s preview in Teams, click on Assign.
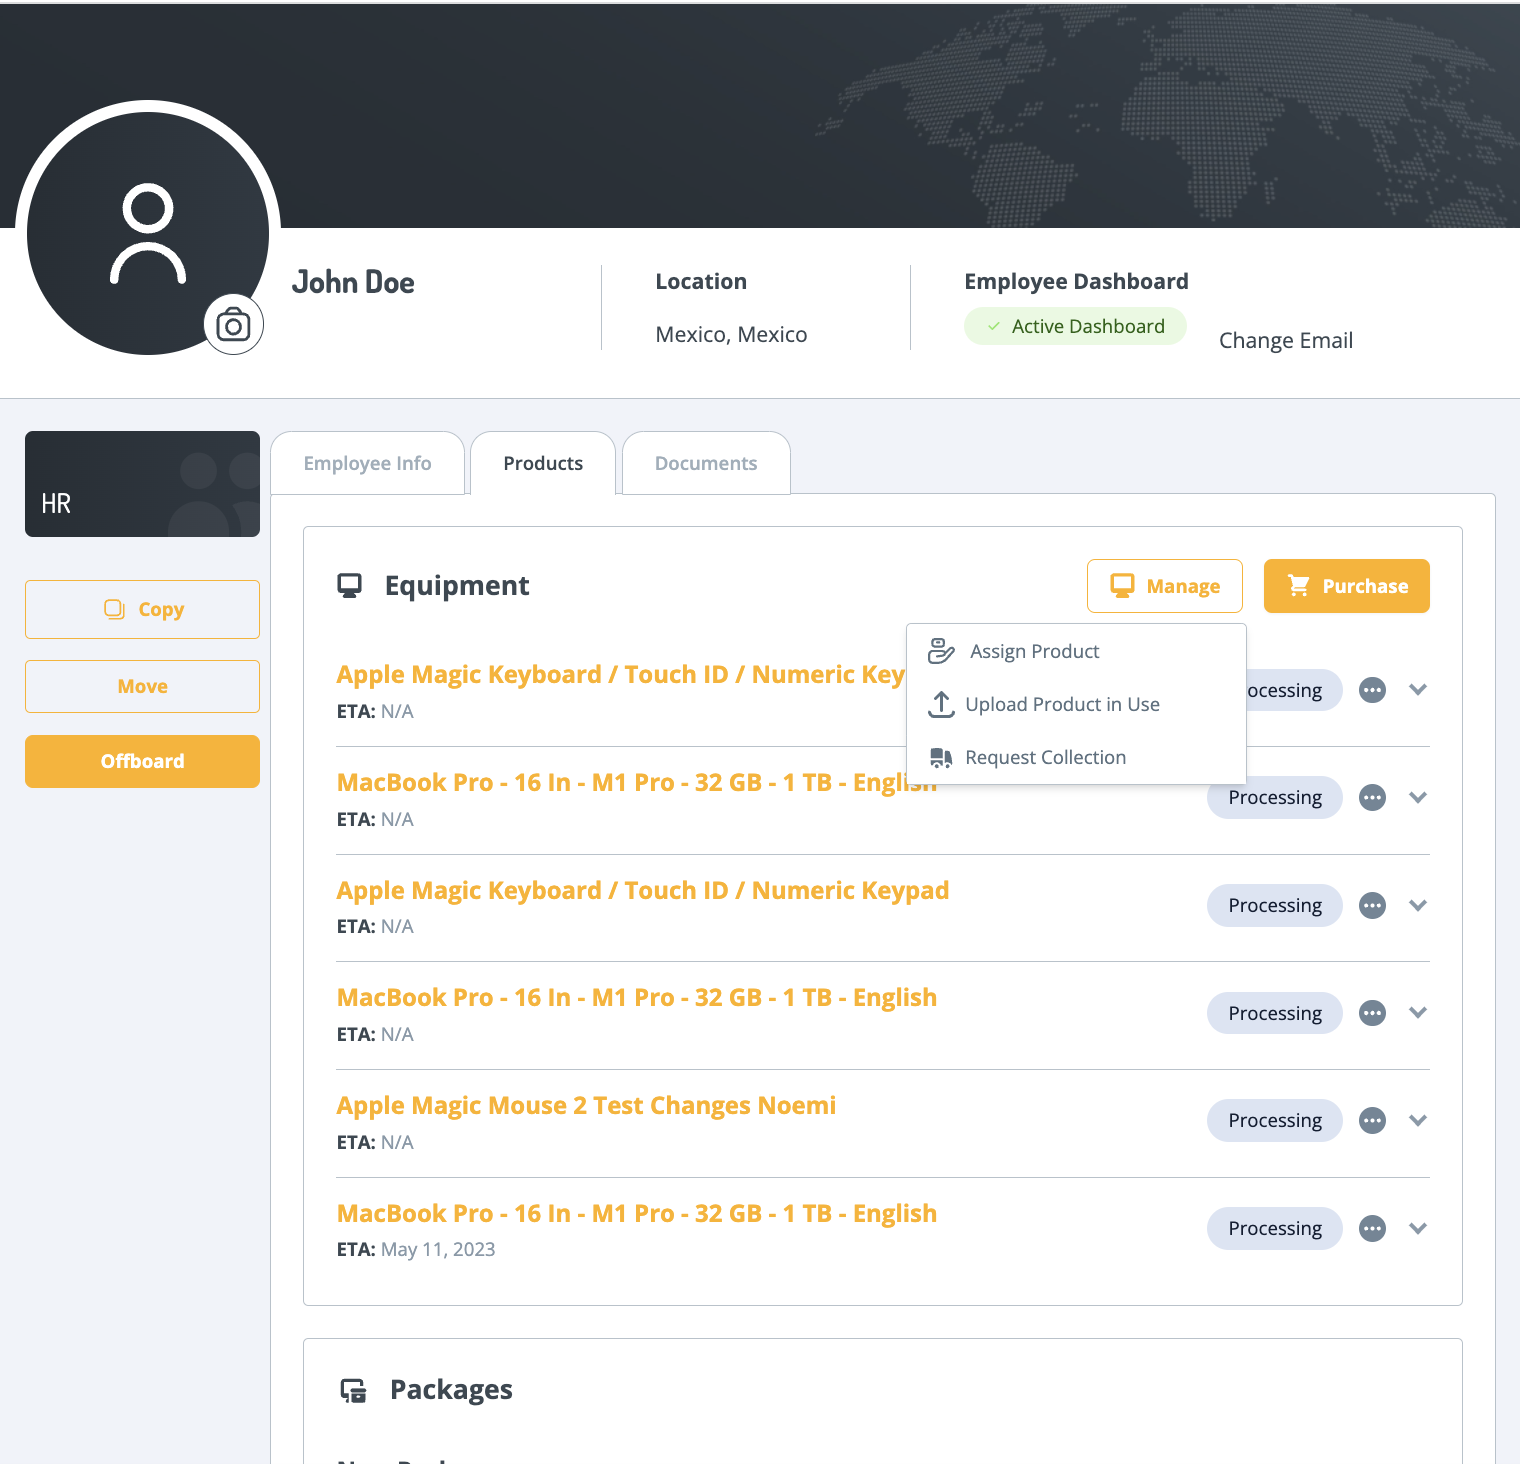

- A popup will ask if the assigned products are managed by GroWrk or your company. Select one option and Continue.
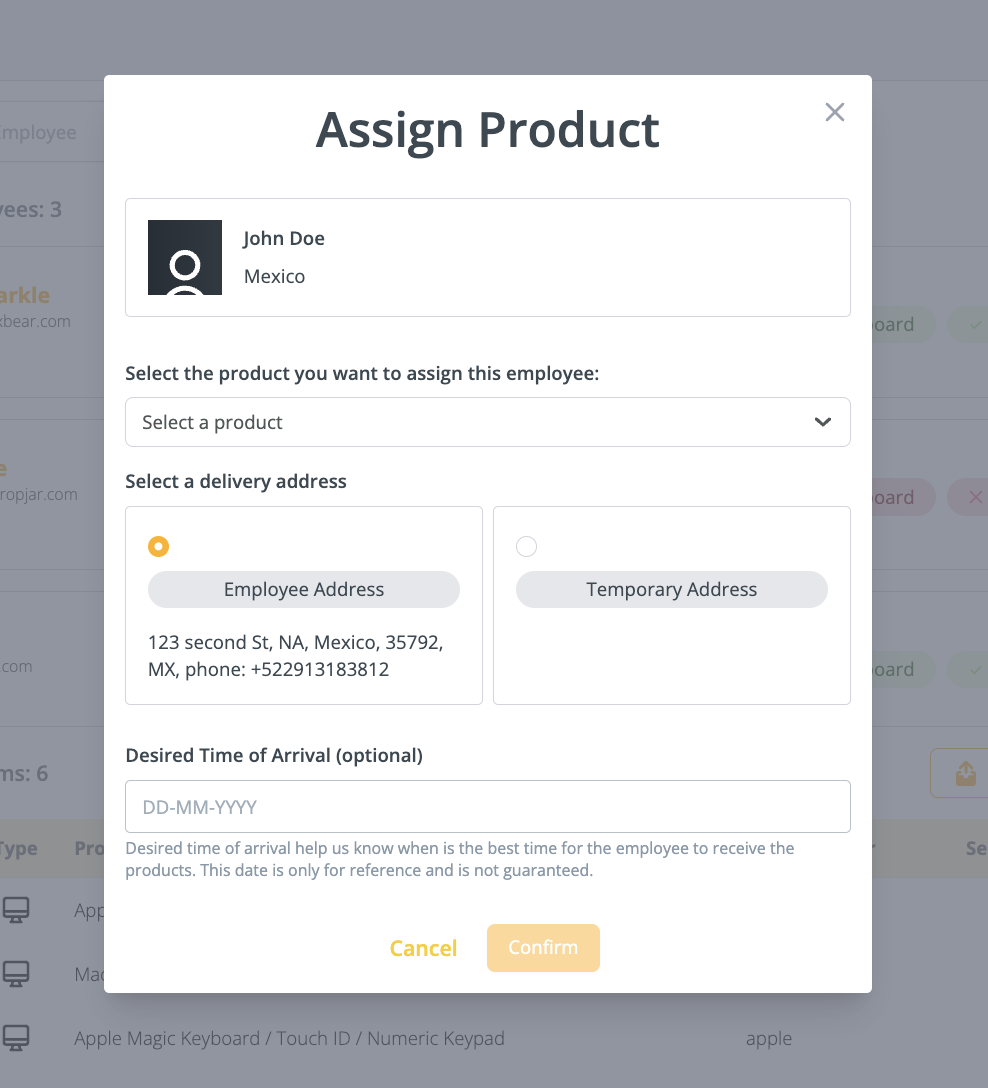
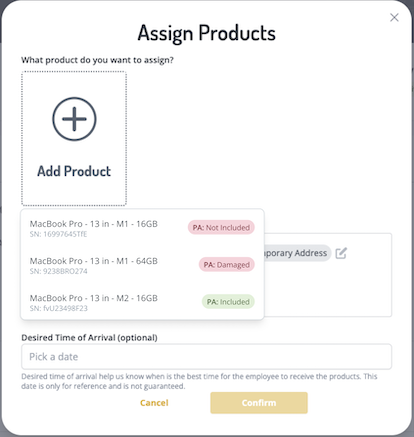
- Select a product and the employee’s delivery address. Select Confirm.
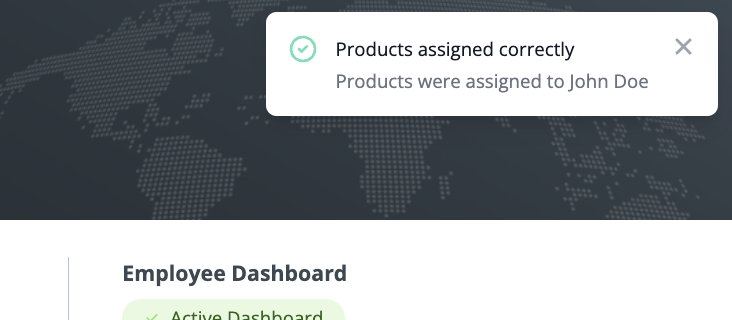
- You’ll be notified that your products have been assigned.
Assign to Employee through Products
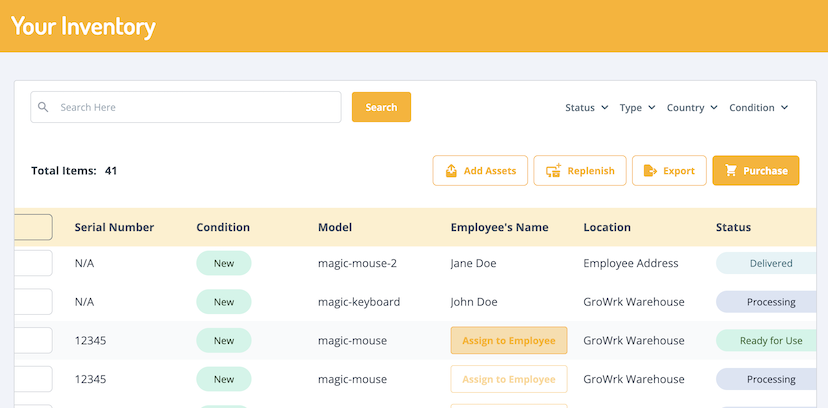
- Scroll through your inventory to select which products you’d like to assign. Then select the Assign to Employee.
- Use the dropdown to select an employee, the delivery address, and desired time of arrival. Select Confirm.
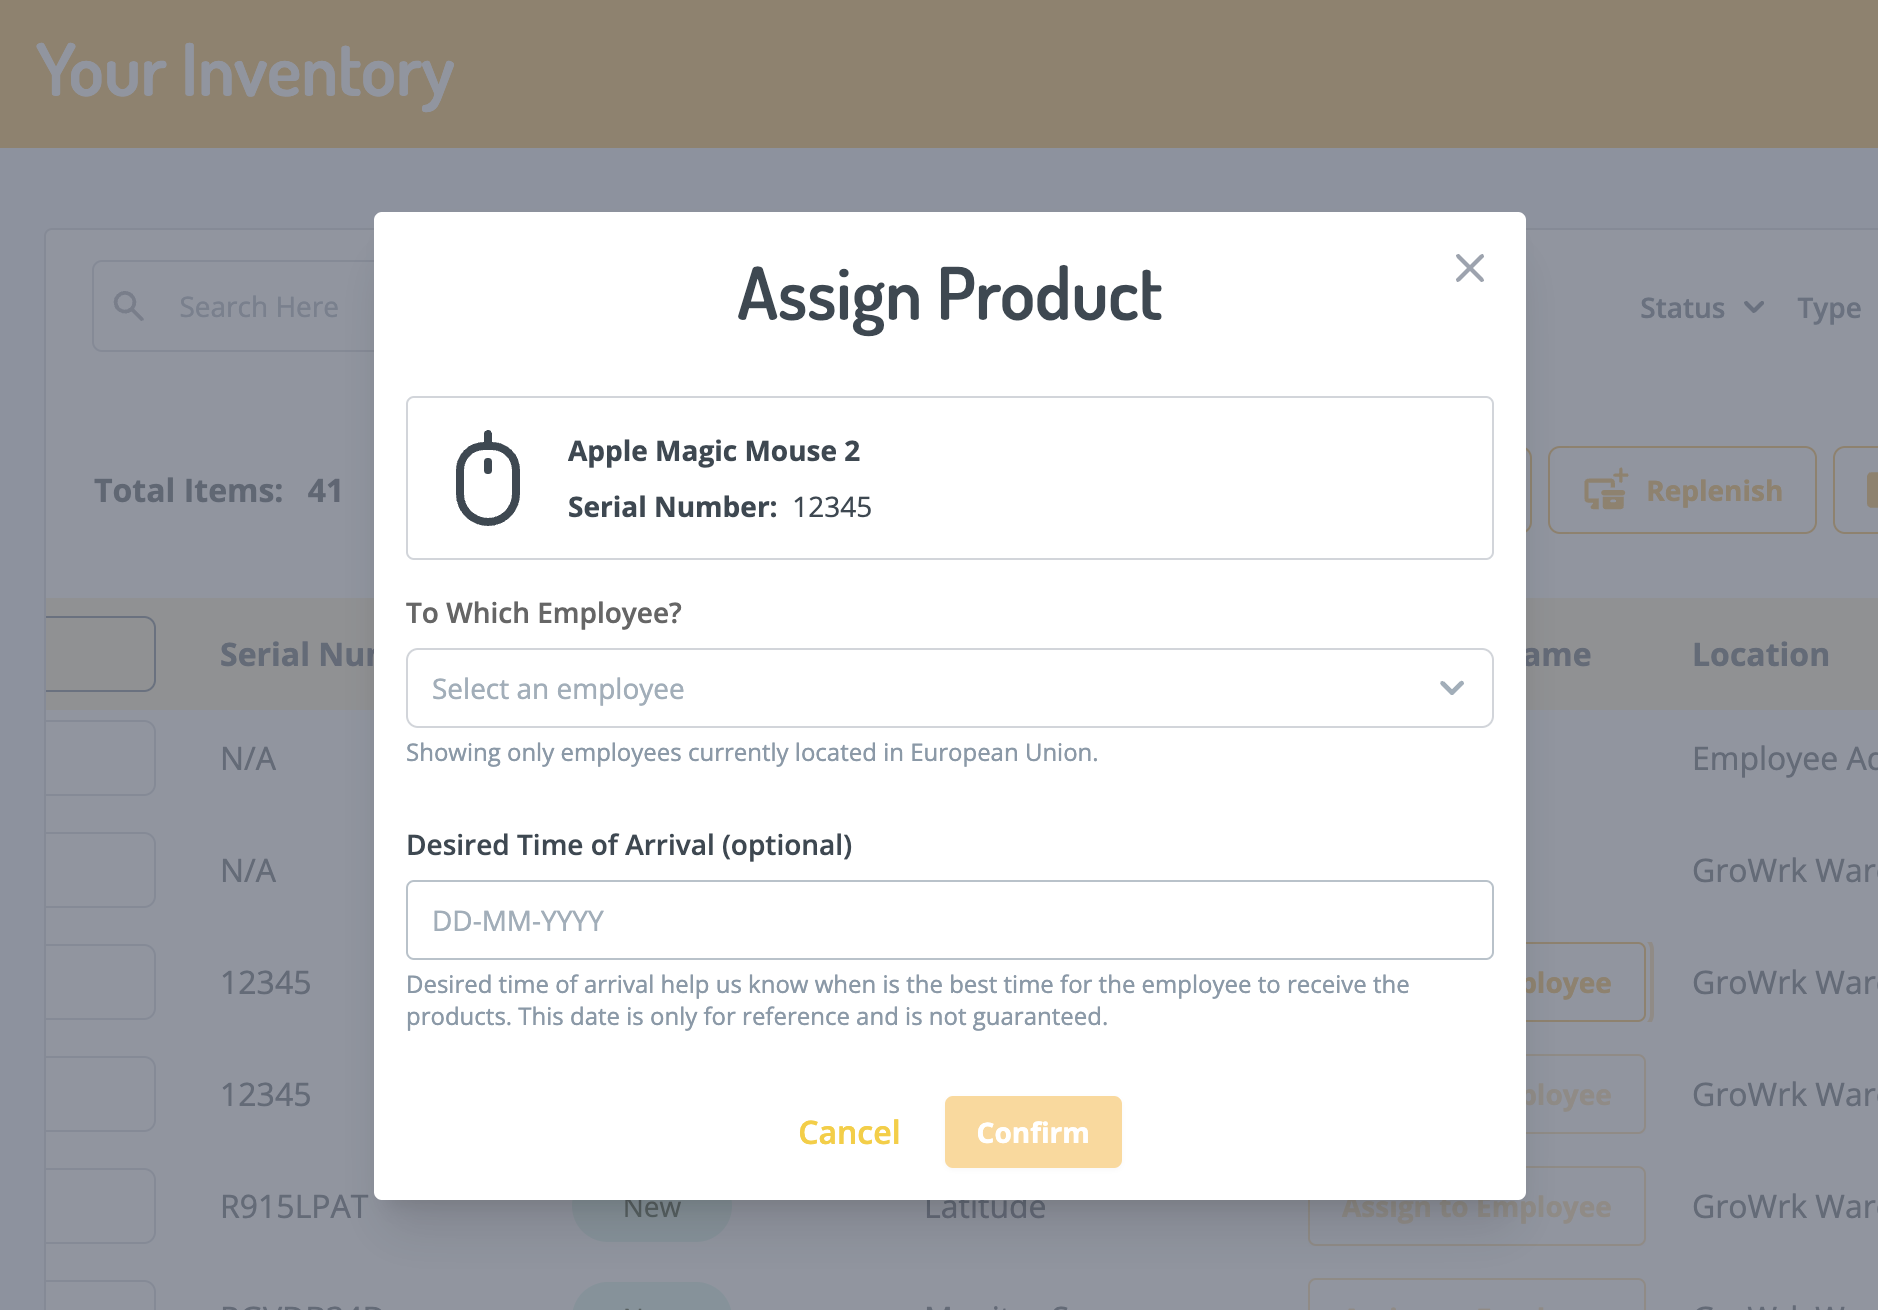
- You’ll be notified that your products have been assigned. An Account Manager will review and contact you for next steps.

Collection
This is an order to recover products from an employee.
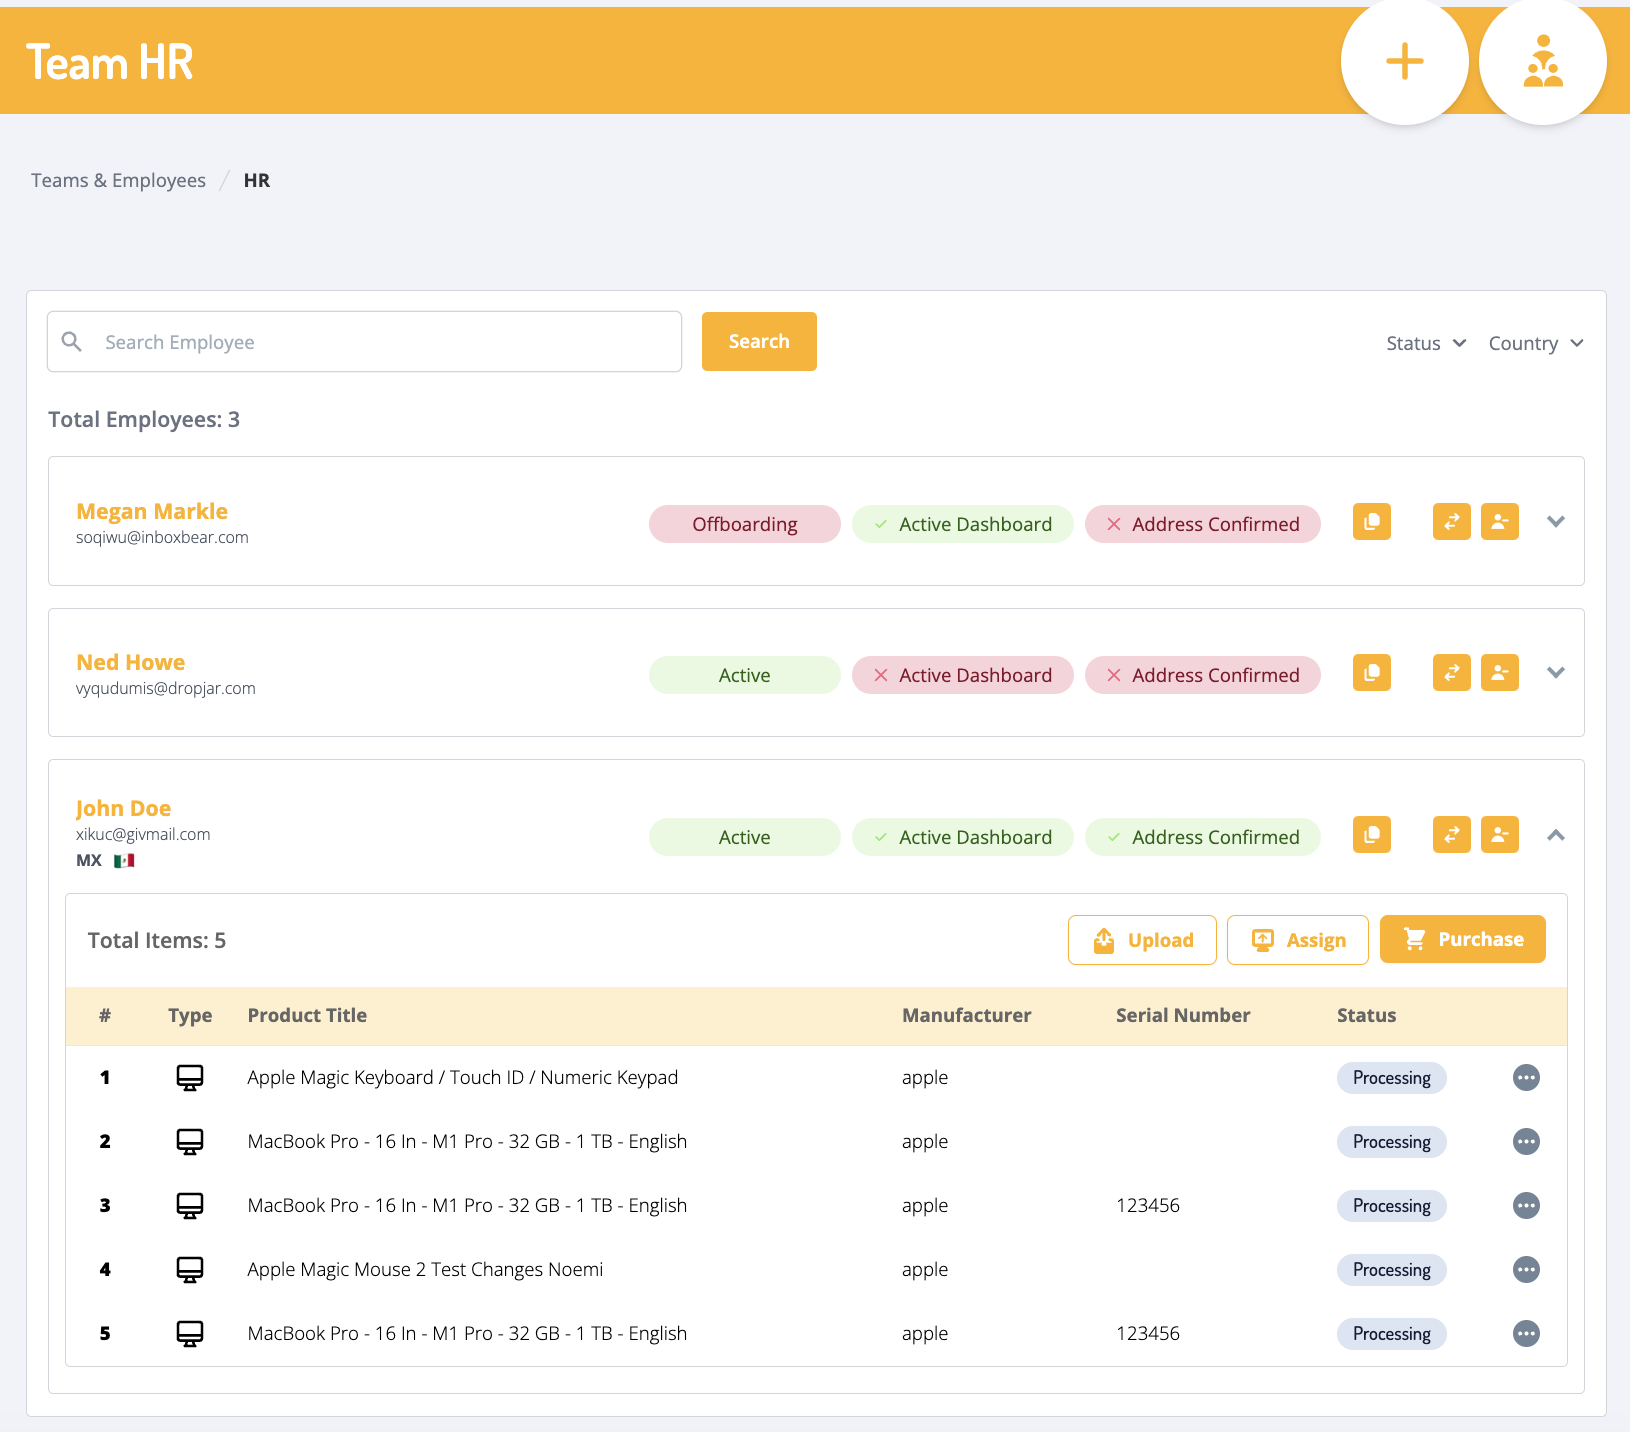
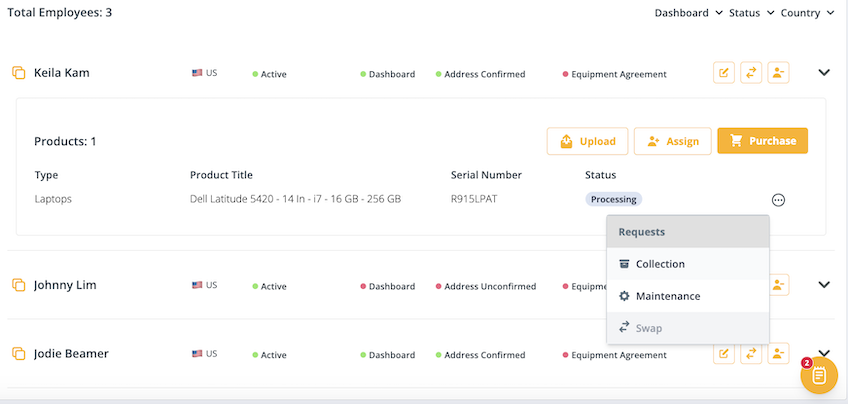
Collection order through Teams
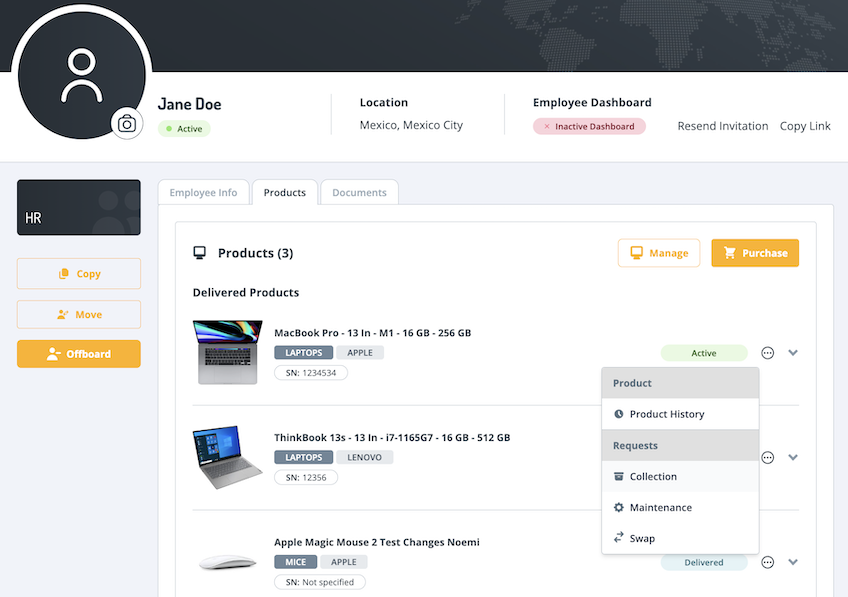
- In Teams, search for the employee that you wish to request a collection order for. Click on the 3 dot icon and select Collection.
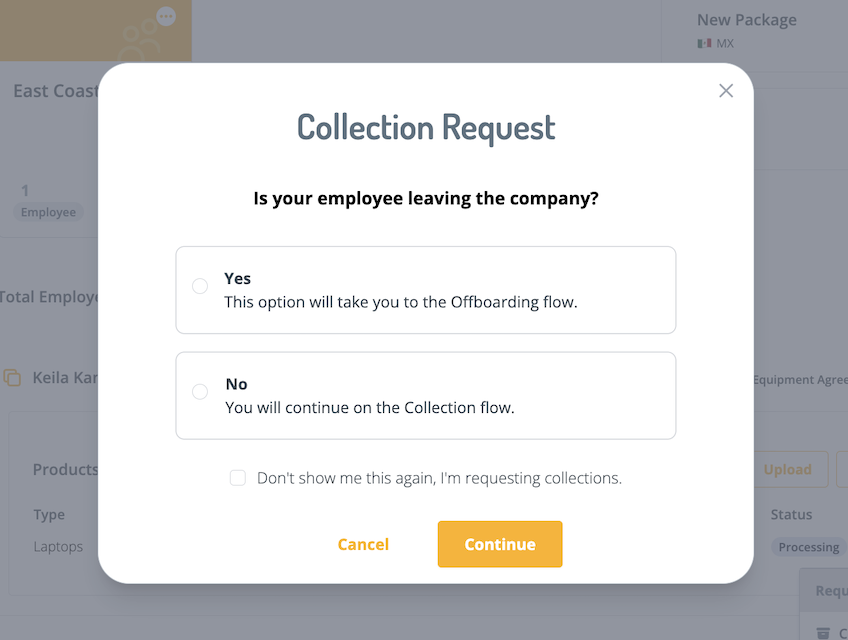
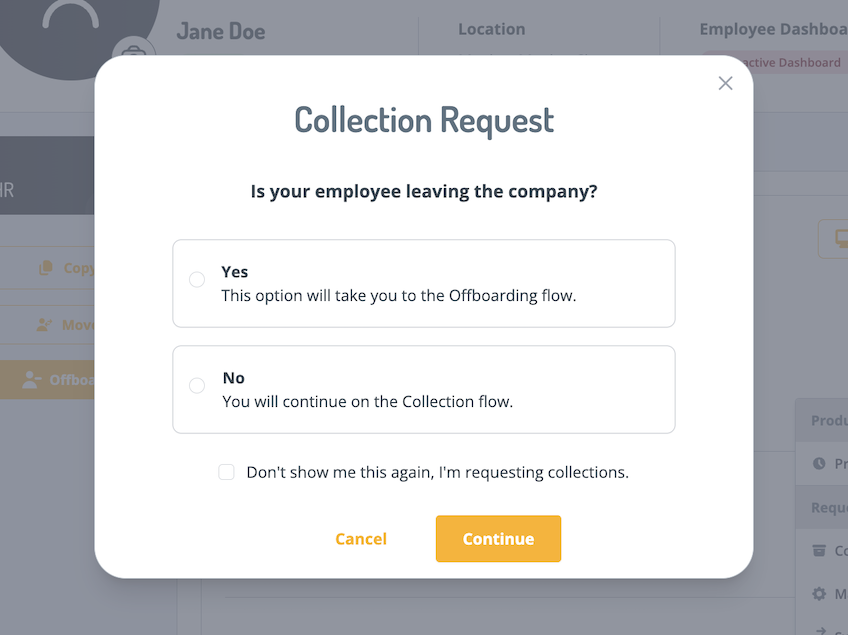
- There will be a pop-up asking to confirm whether the employee is leaving the company or not. If they aren’t, you will select Continue onto the Collection flow.
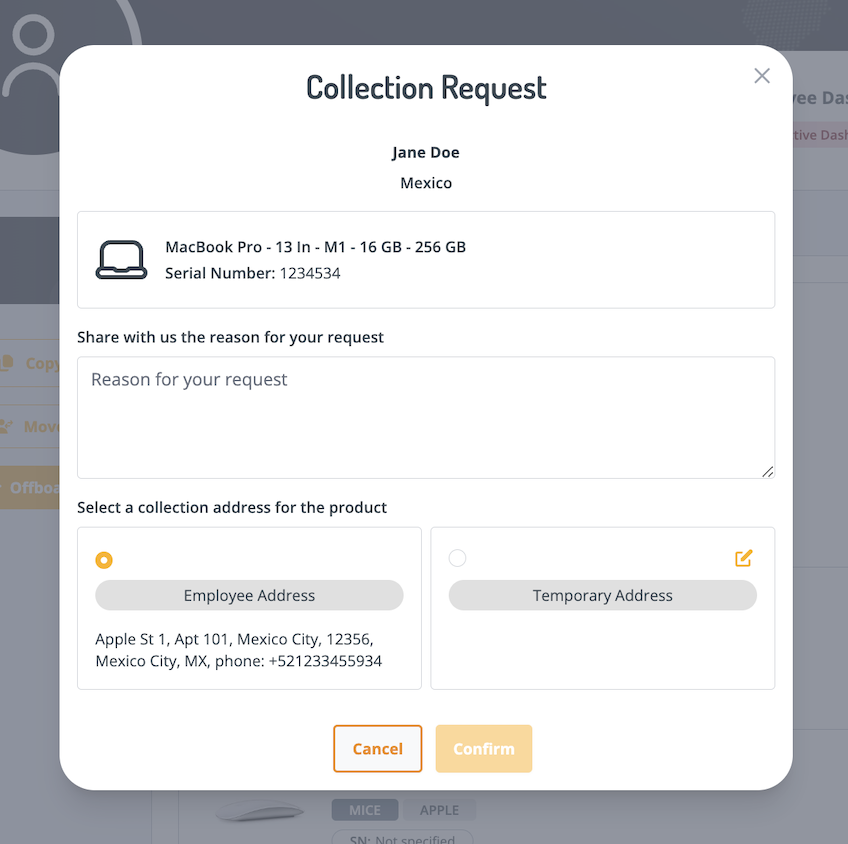
- Provide a reason for the request. Select Continue.

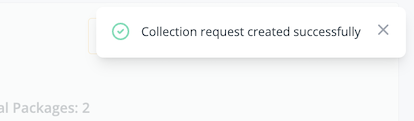
- You will notified at the top right corner that your collection request has been made. Requests will be reviewed by Account Managers and they will contact you for further steps.
Collection order through employee profile
- Click on the Products tab in your employee’s profile. Search through their equipment list for the product you’d like to collect and click on the 3 dot icon and then Collection.
- There will be a pop-up asking to confirm whether the employee is leaving the company or not. If they aren’t, you select Continue onto the Collection flow.
- Provide the reason for the request and select Continue.
- A notification at the top right will confirm that your request has been made. An Account Manager will review the request and reach out to you for further steps.

Bulk Collections through Employee Profile
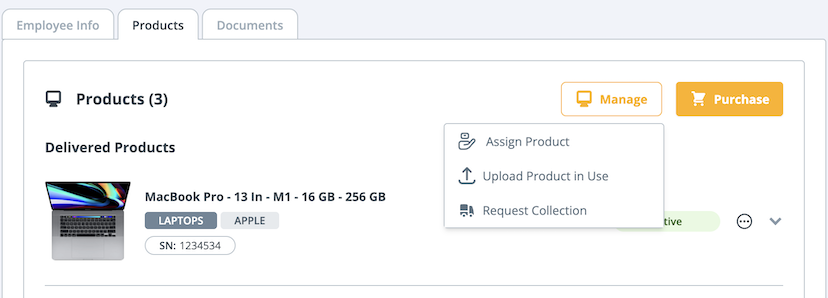
- In the Products tab, select Manage and then Request Collection.
- Confirm the collection address of your employee to proceed.
- All products that are active with the employee will be listed. Using the checkbox, select which products you would like to collect.
- Review the employee’s personal and contact information, address, and the selected products. Select Confirm and an order will be placed.

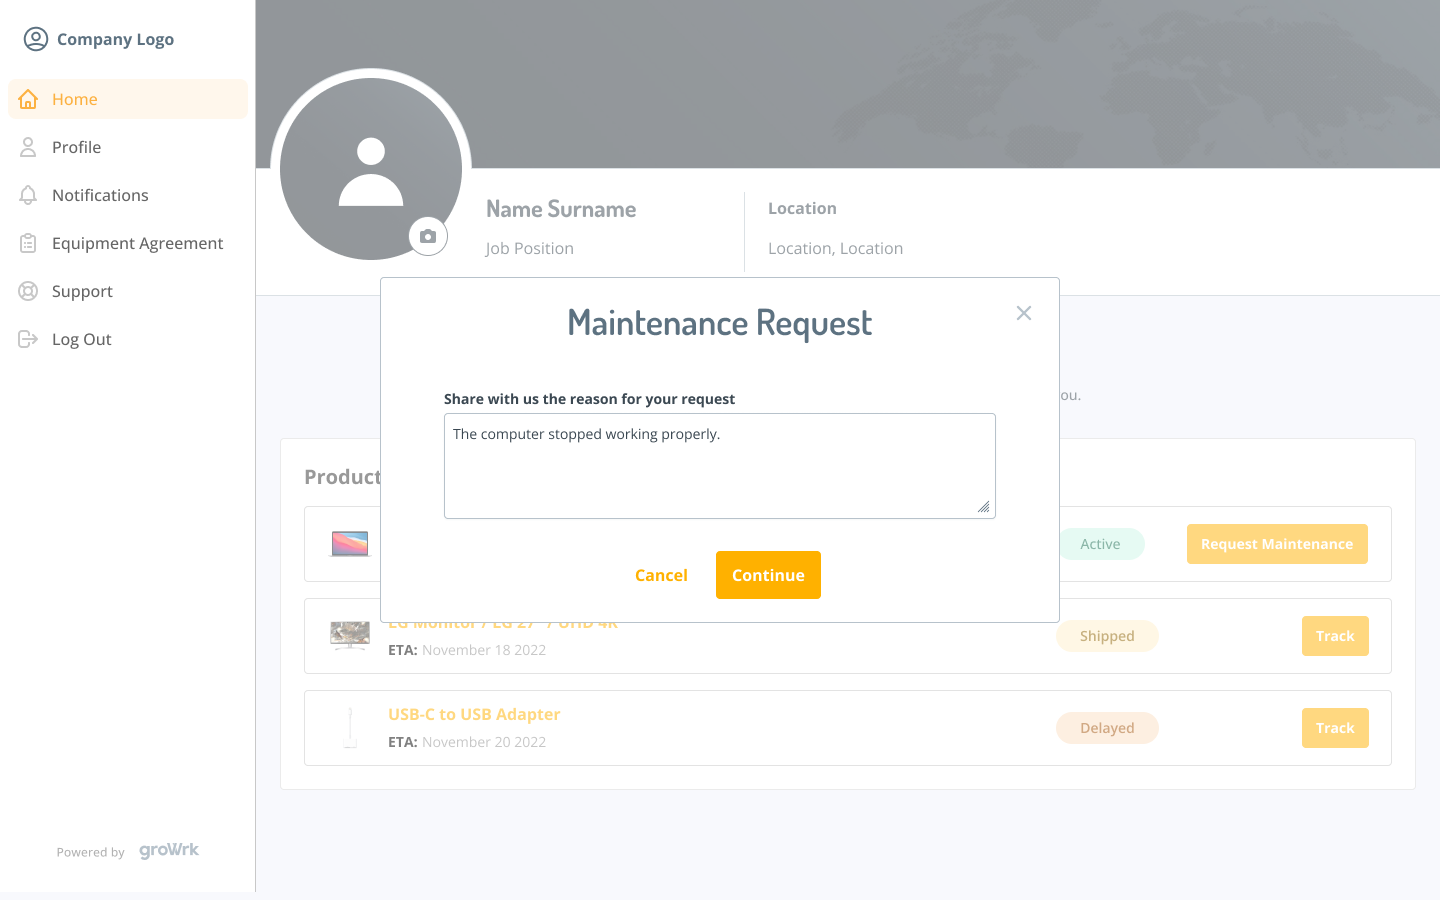
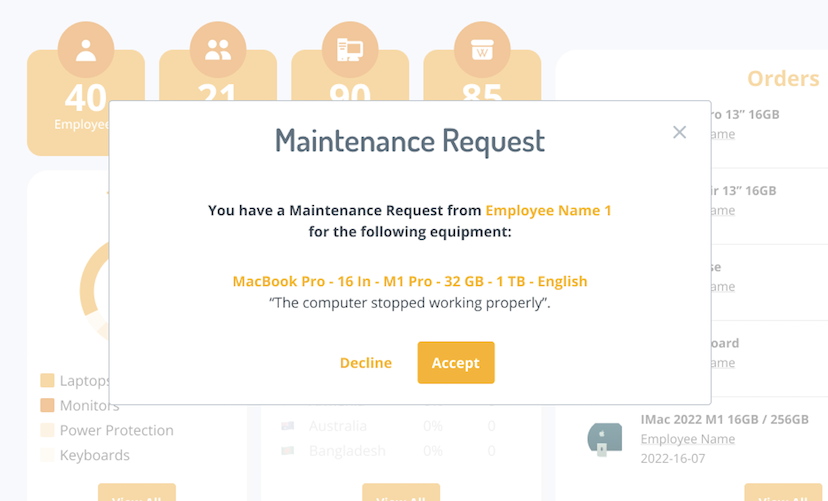
Maintenance
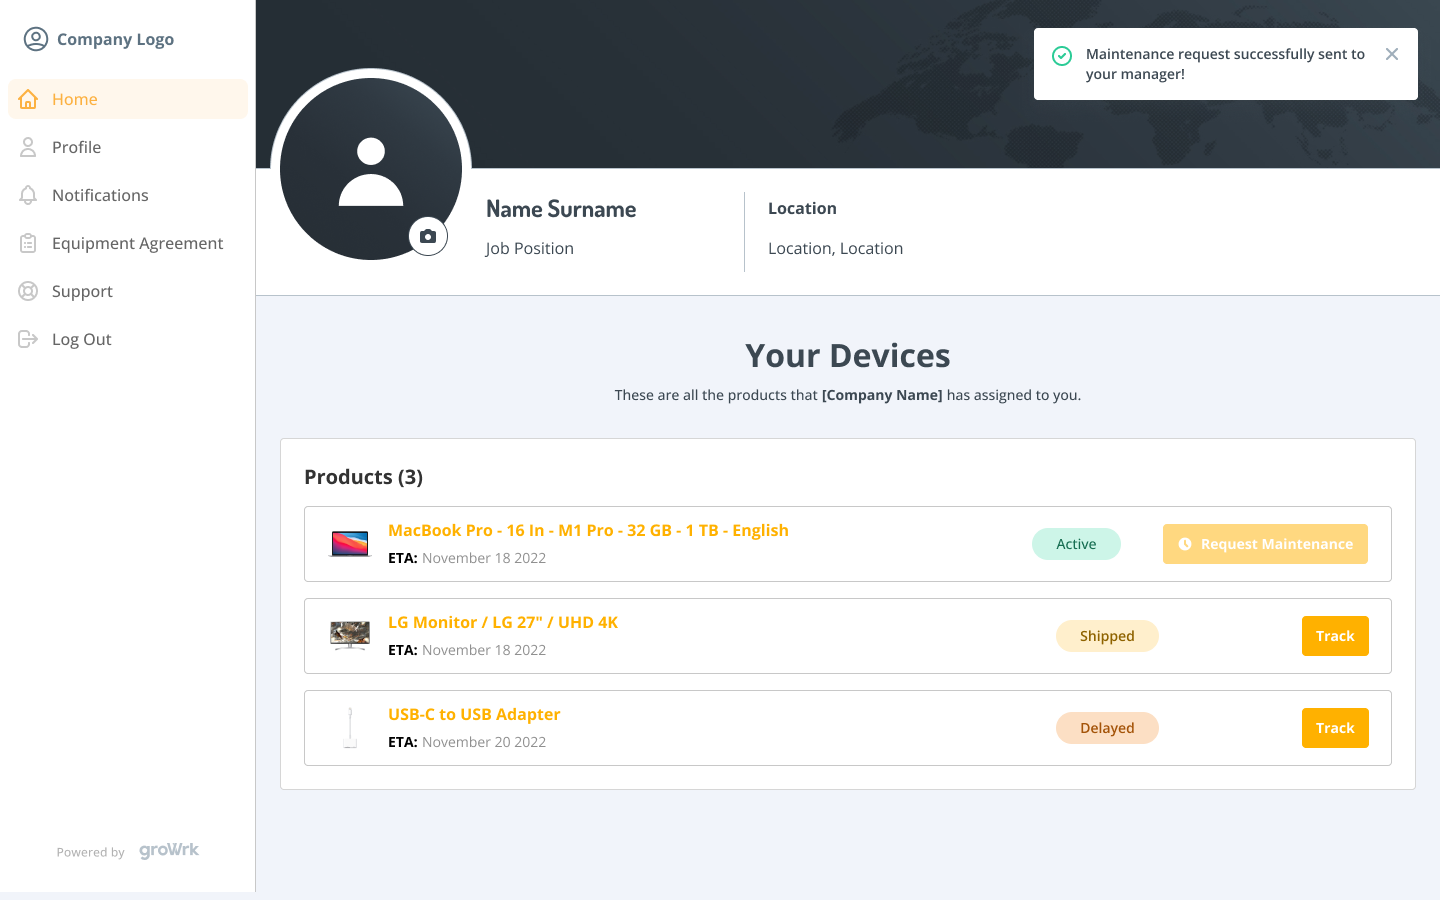
This is a collection order for products that require inspection and possible repairs. Maintenance orders start with a maintenance request initiated by employees if they have devices that need to be examined for repairs.
- Your employee sends in a maintenance request through the Employee Dashboard.
- You or company managers will accept or deny the request.
- Account Managers will review the request and contact you for further steps.
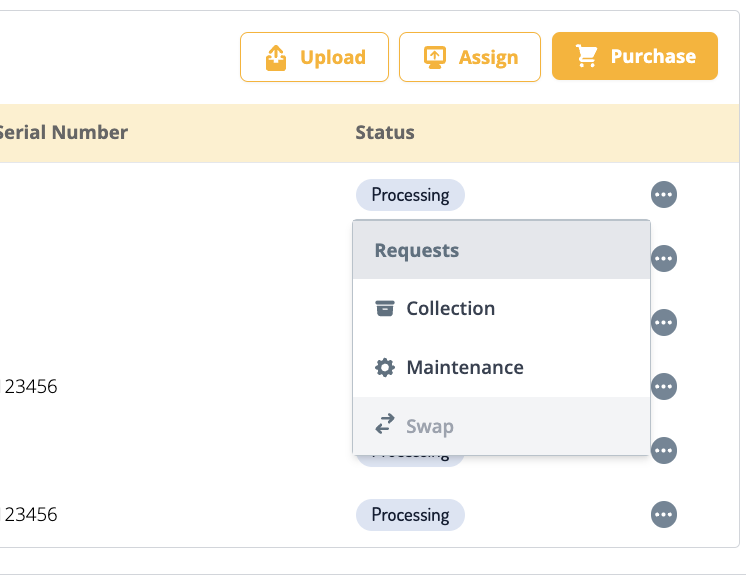
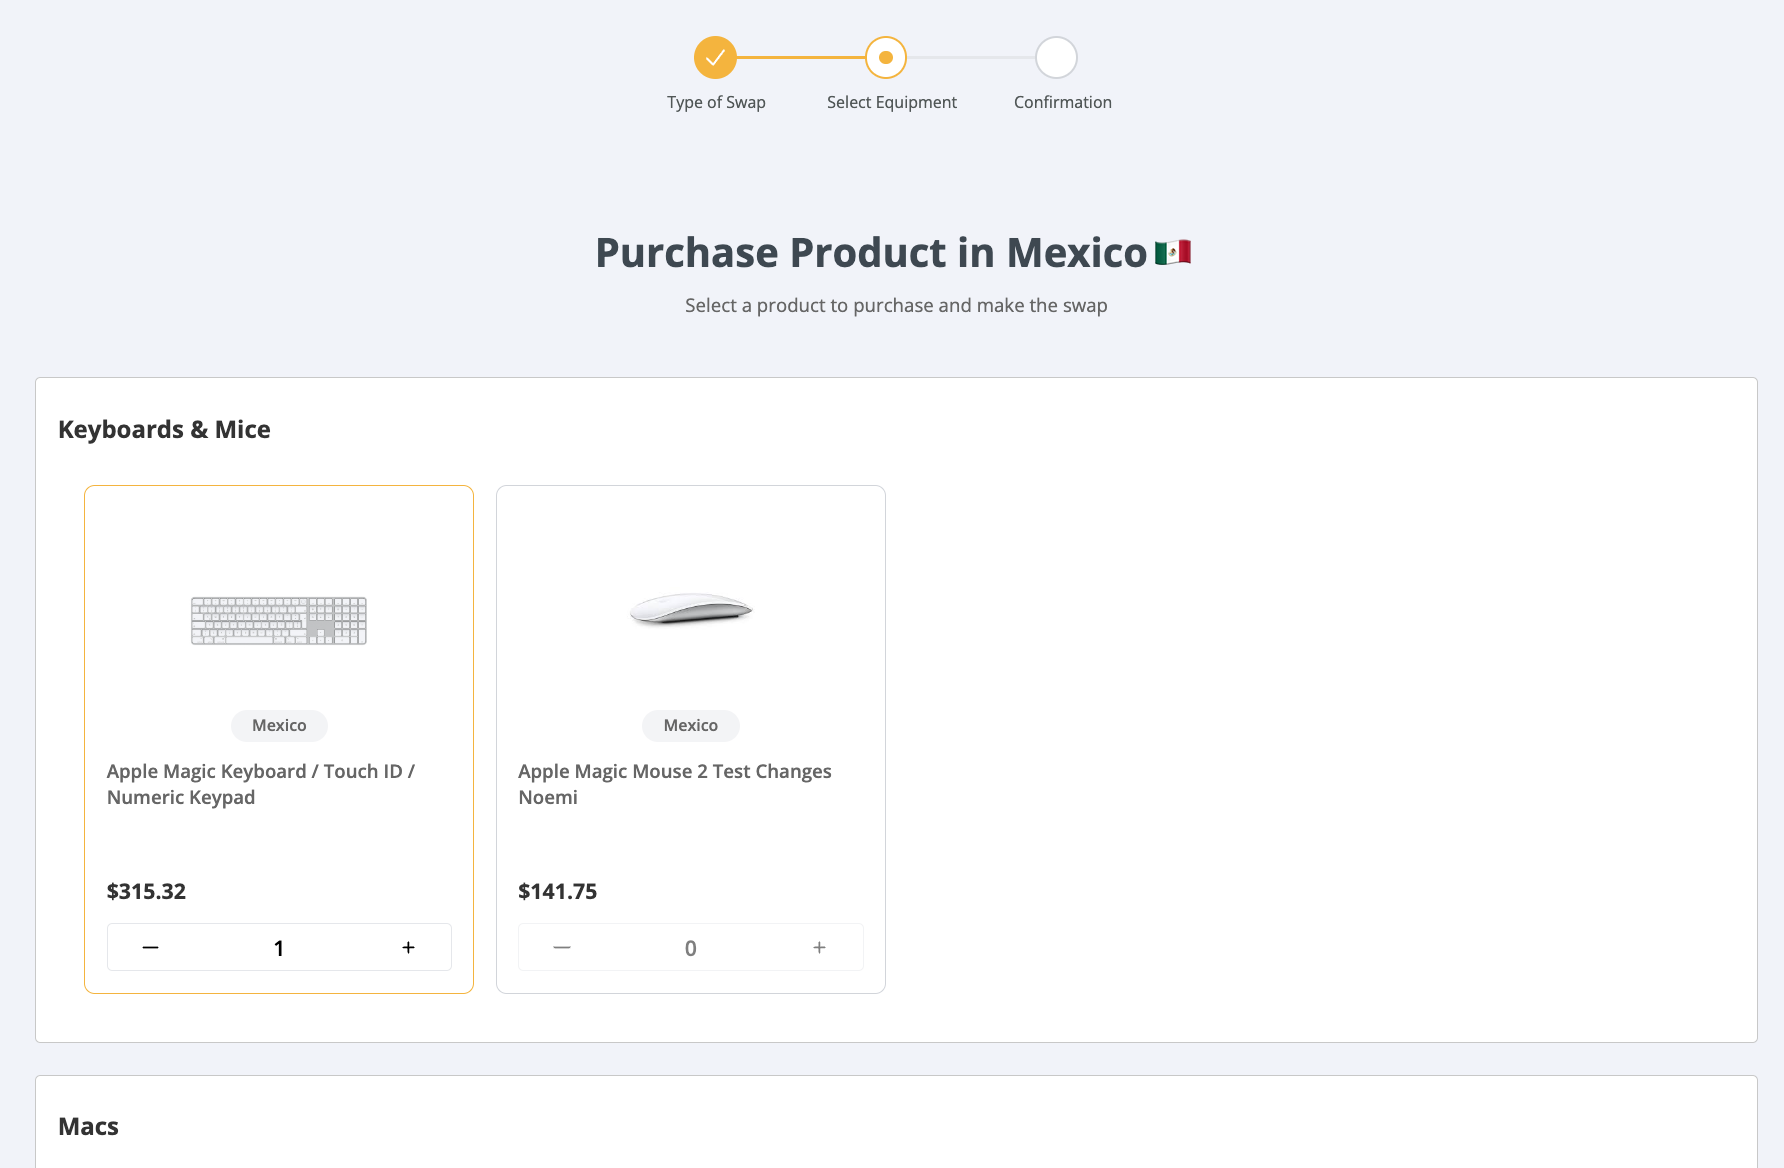
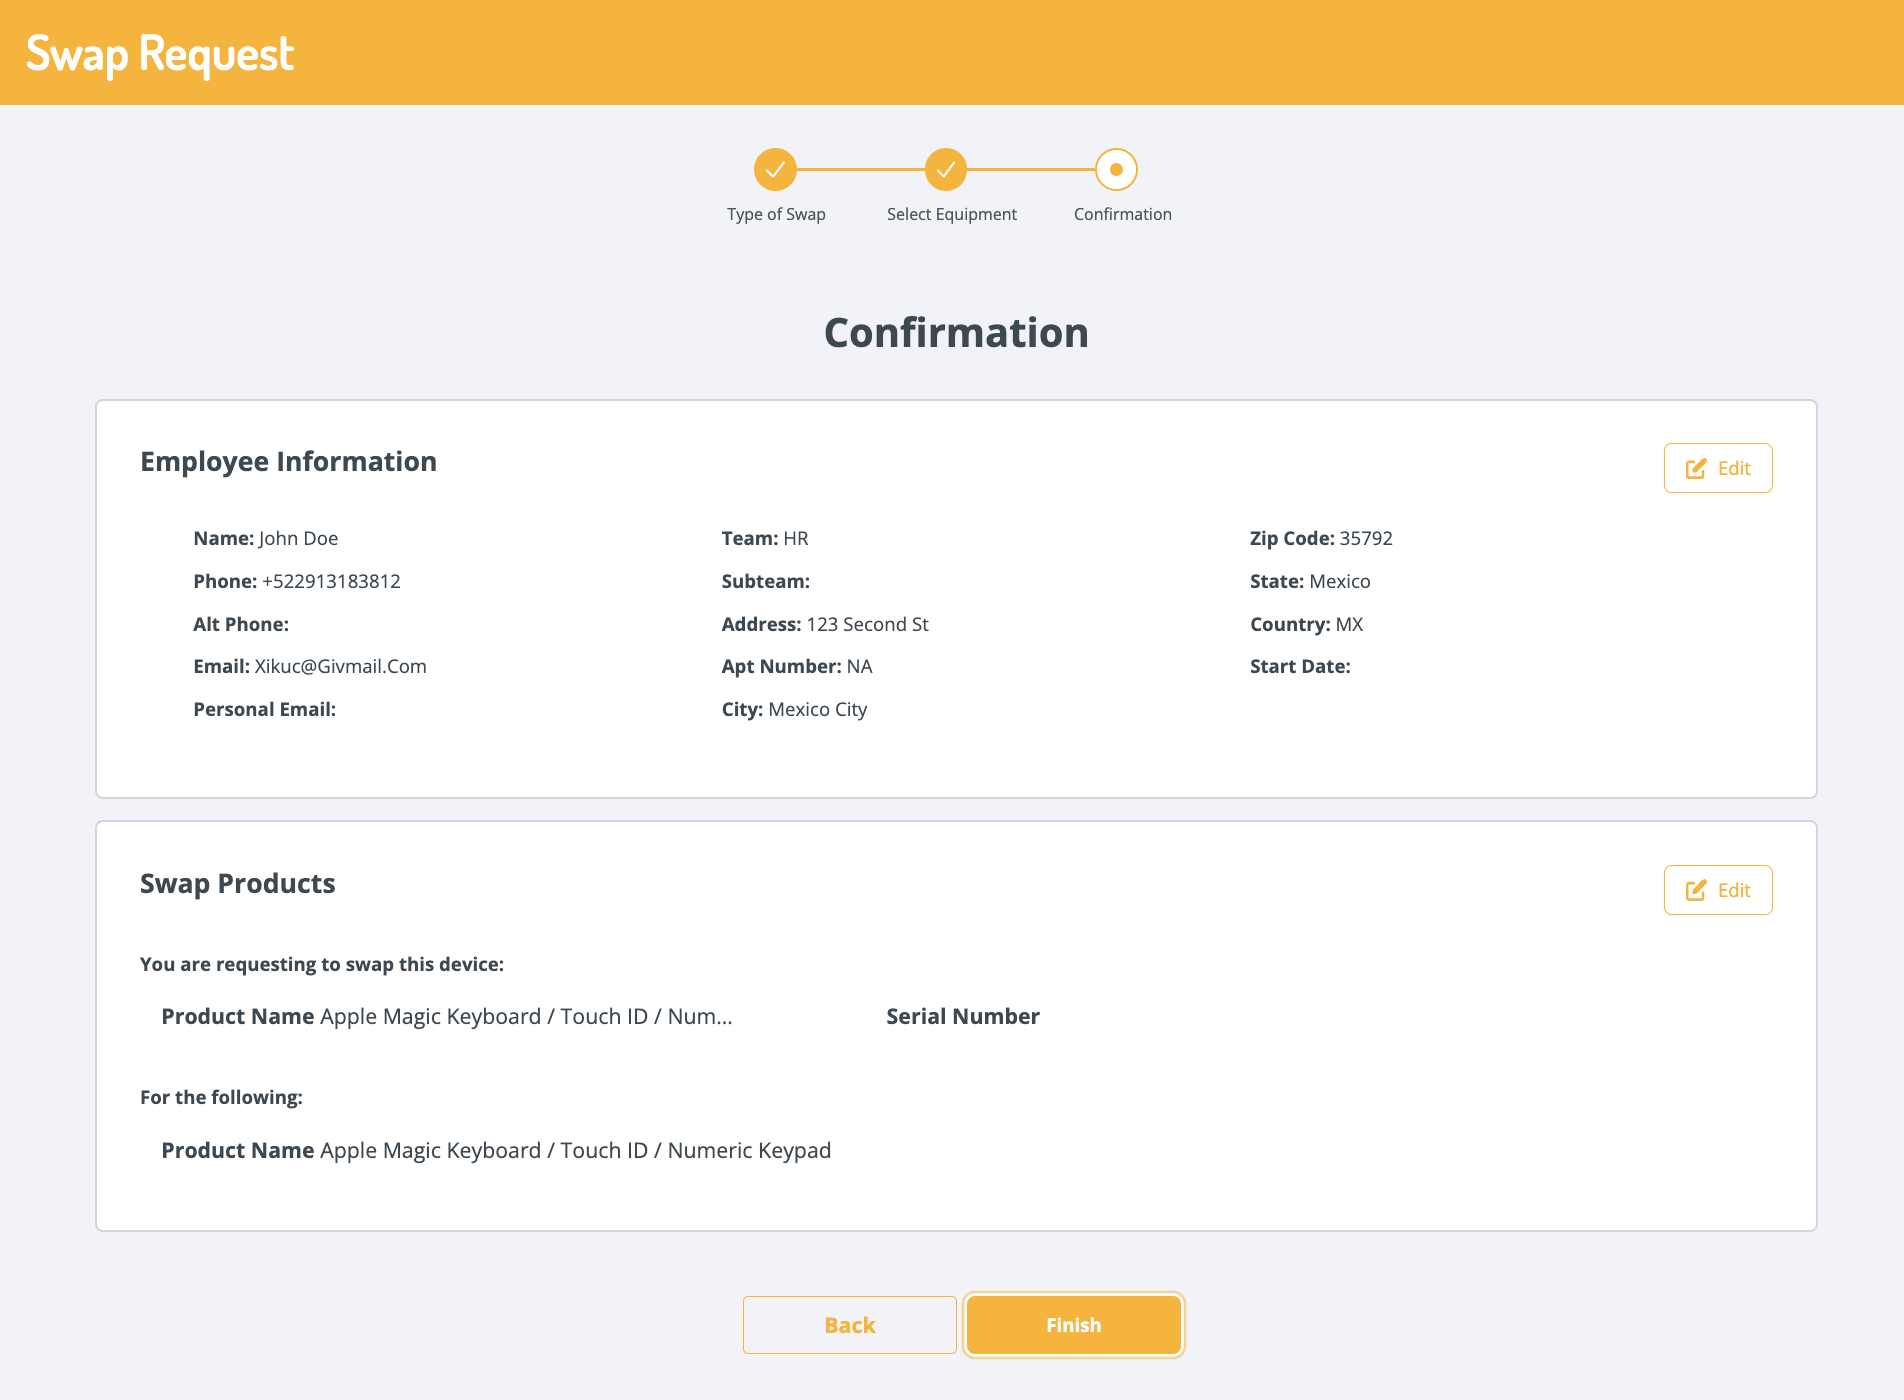
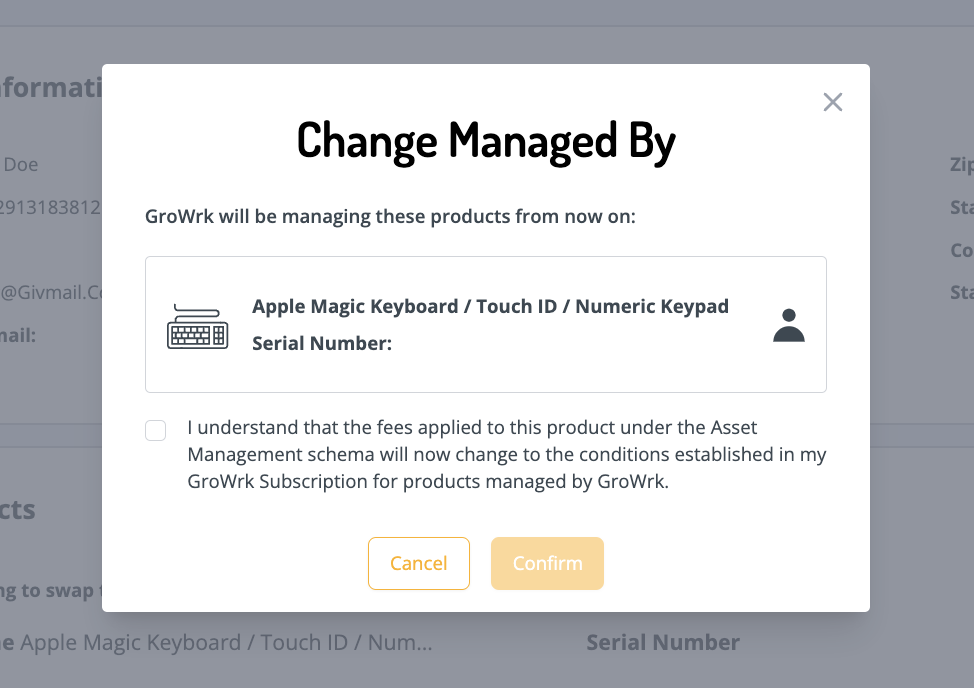
Swap
Swap orders entail either a Purchase for Employee or Assign to Employee order and a Collection order.
- Go to where your employee’s products are listed (on employee’s profile or employee’s preview). Click on the 3 dot icon of the product you’d like to select and click Swap.
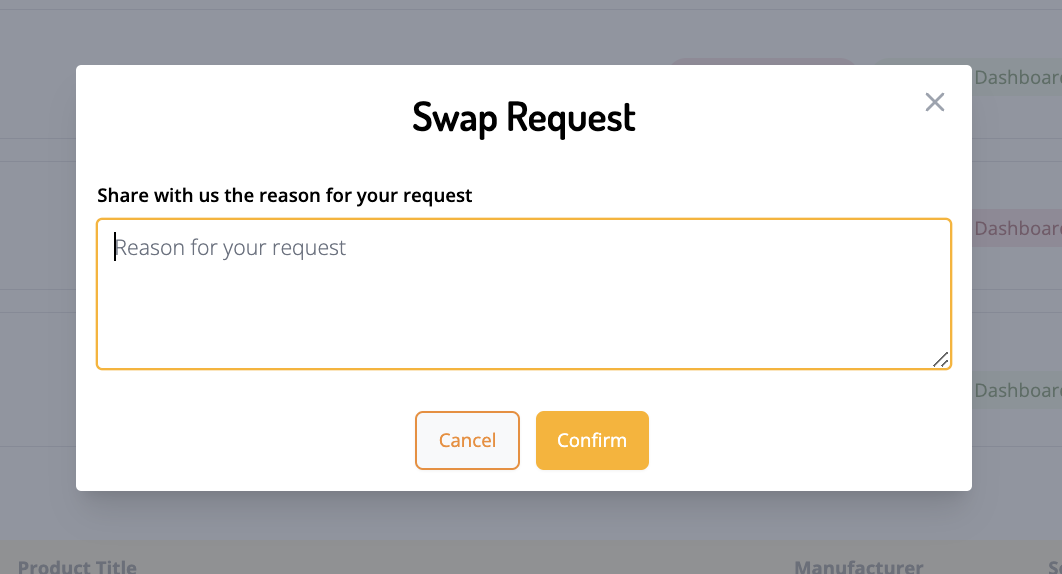
- A pop-up will ask for the reason for the swap request. Type in the details of the request and click Confirm.
- You’ll select either Use My Inventory Pool or Purchase for Employee to swap the product.
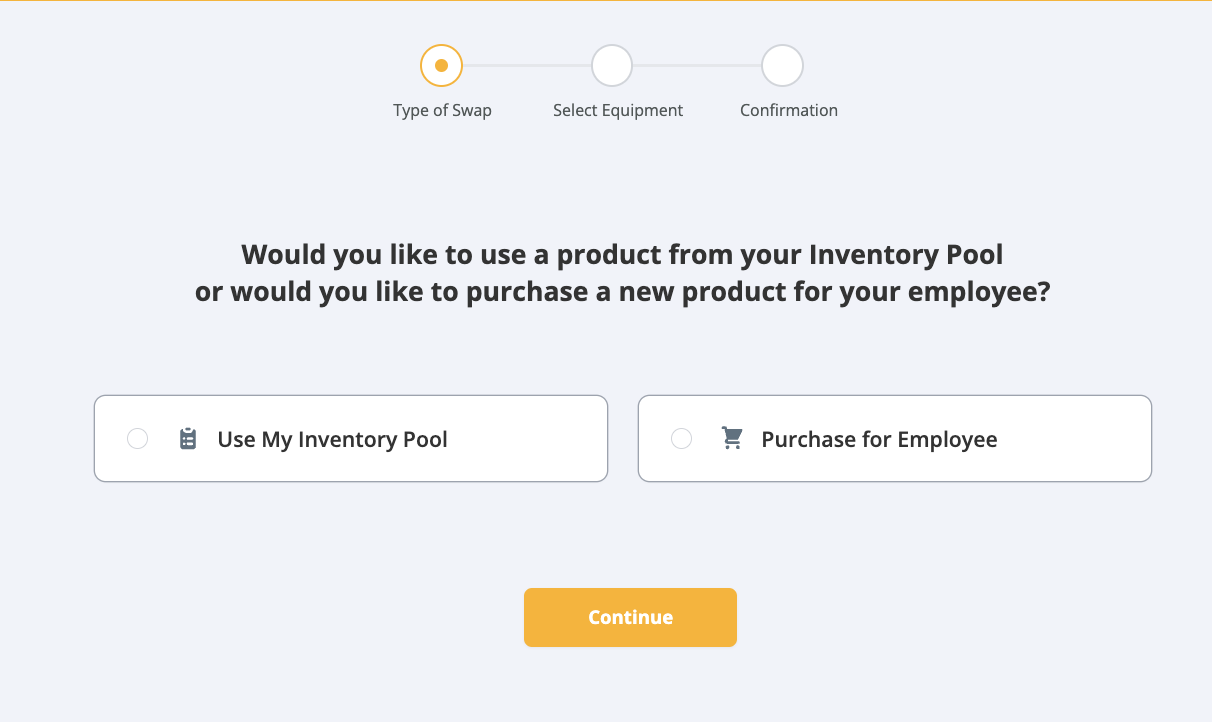
- This step is to select products to swap with. If you chose Use My Inventory Pool, you’ll select through your inventory. Click Continue.
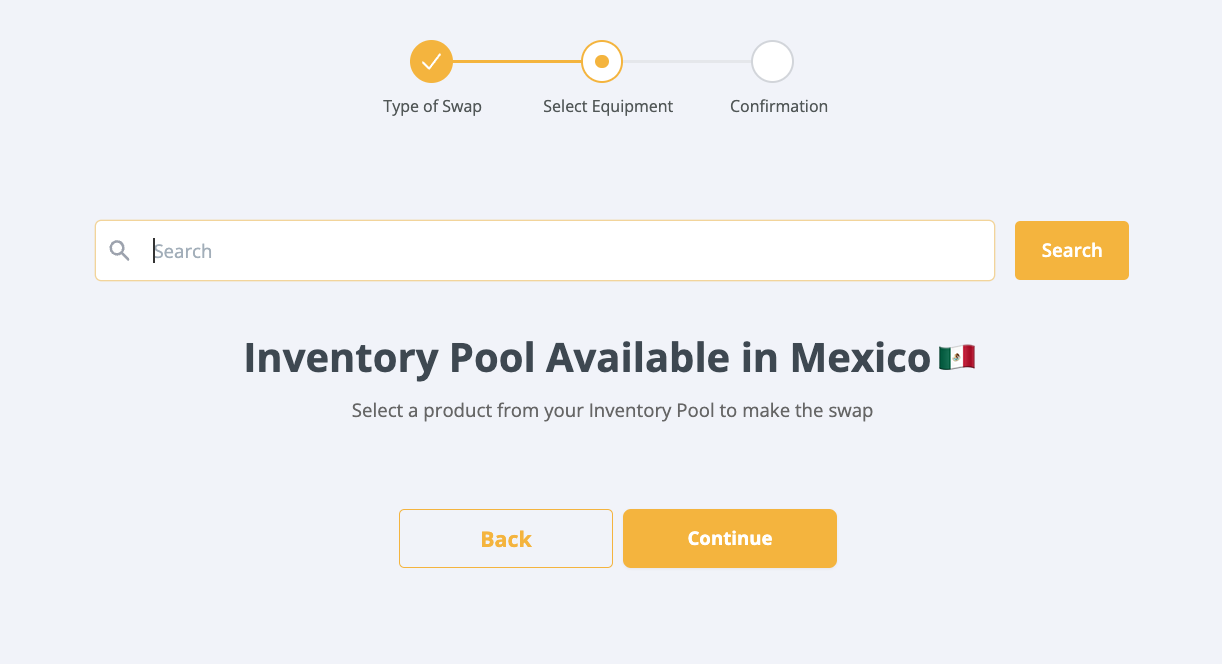
Or If you chose Purchase for Employee, you’ll be shown the products available to purchase in that region. Click Continue.
- You’ll then be shown your employee’s information and product information to review. Click Finish.
- The last step is to confirm that GroWrk will be managing the swapped products moving forward. Click the checkbox and click Confirm. You’ll be notified of the update.
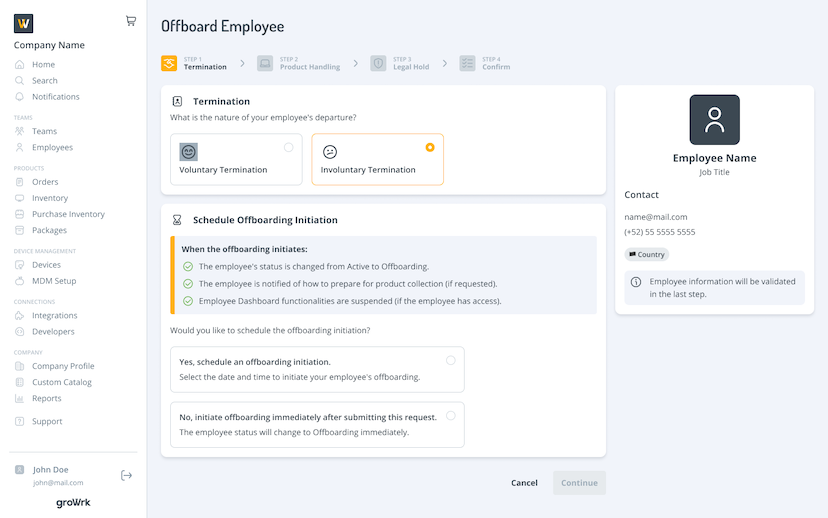
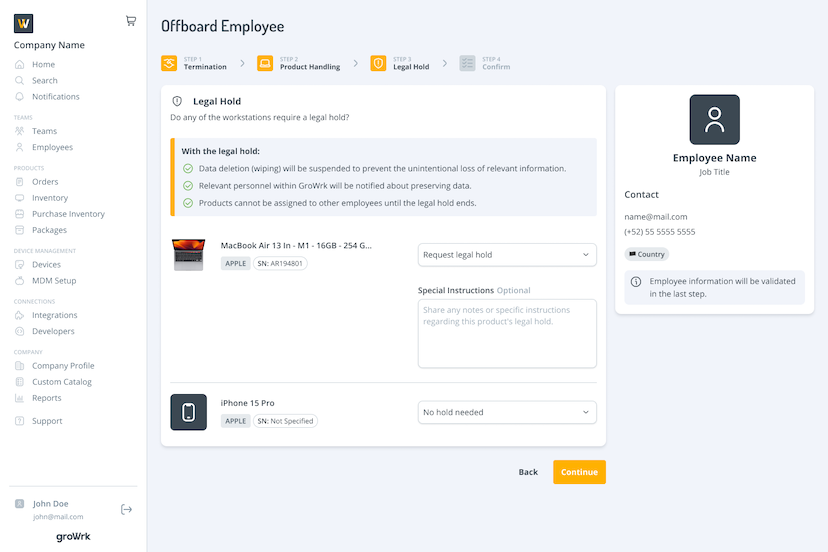
Offboarding
The offboarding flow is organized into four sections: Termination, Product Handling, Legal Hold, and Confirm.
- Select whether this is a voluntary or involuntary termination of your employee.

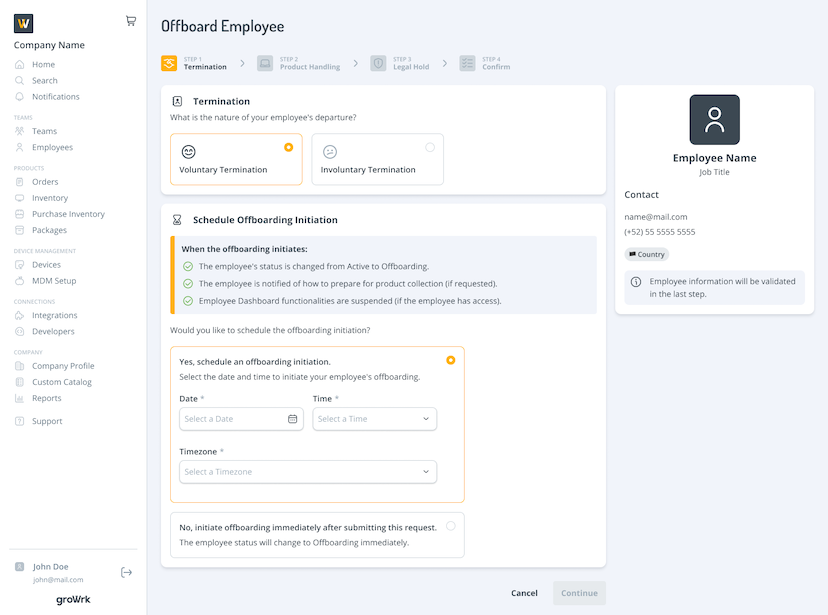
- Select whether to schedule an offboarding initiation for a set date and time, or initiate offboarding immediately after confirming the request. Select Continue.
If you select yes, select a date, time, and timezone for the offboarding initiation.
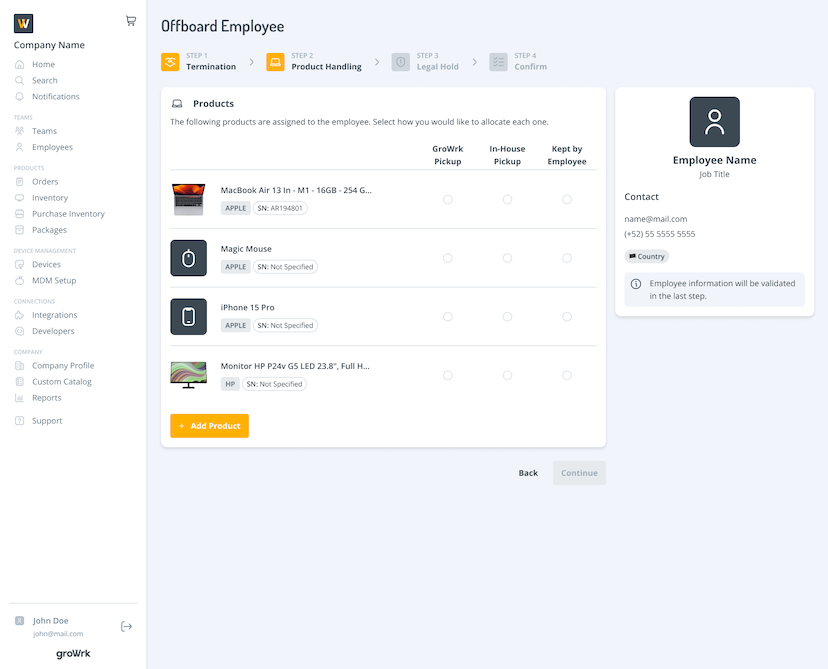
- Each of the products that the employee has will be listed. Indicate how each one will be allocated (GroWrk pickup, In-house pickup, or kept by employee.)
- Indicate if any products require a legal hold using the drop downs.
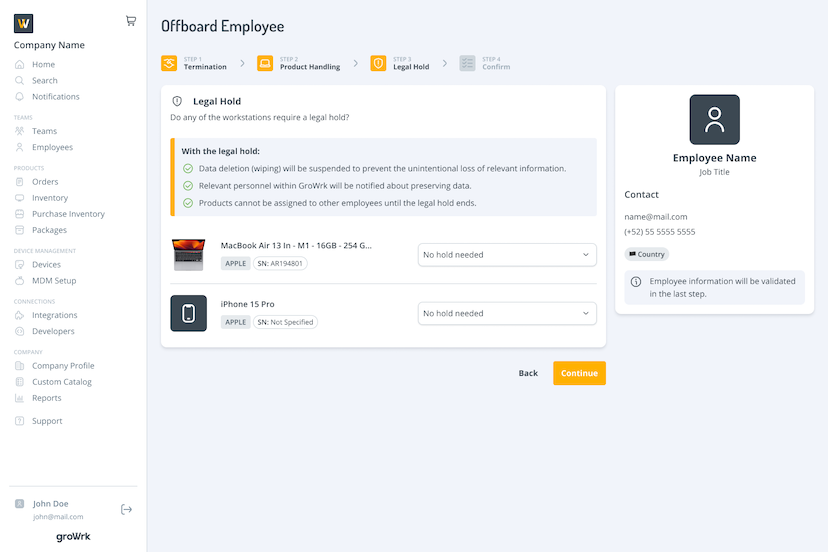
If you select Request legal hold, there will be a section to enter any special instructions regarding the hold request.
- Review all the information regarding the offboarding order. If everything is correct, use the checkbox to agree to GroWrk’s offboarding Terms and Conditions. Select Confirm.
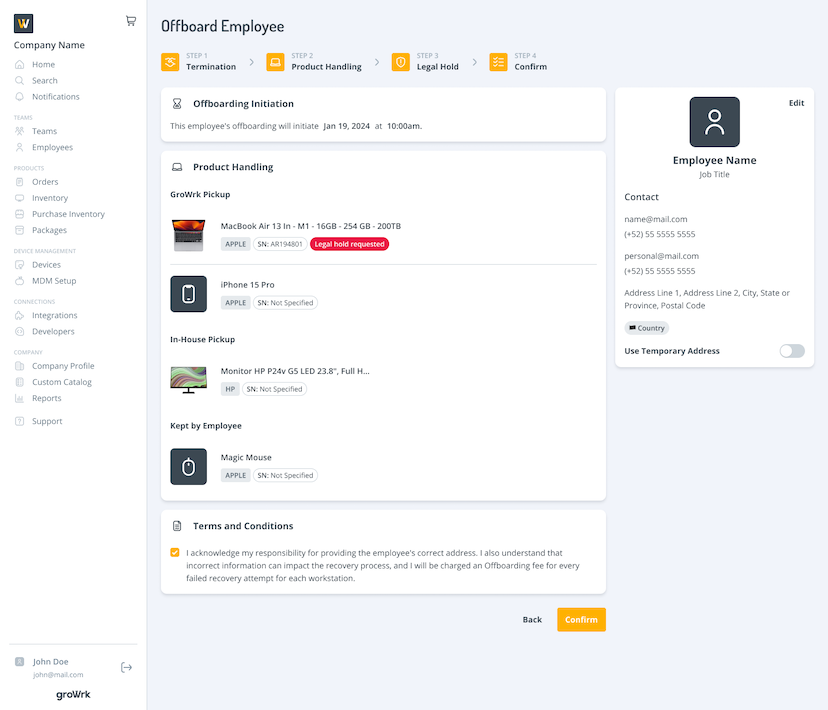
Note: You cannot place an offboarding order if the employee's contact or address information is missing. Once this information is provided, you can proceed with the order.
Pickup Attempts
Pickup Attempts is the number of attempts made by GroWrk to pickup a product from an employee that is in a collection order. An attempt is considered a failure if GroWrk is unable to retrieve the product from the employee. Failed attempts will be recorded by GroWrk staff and will be visible in the Order History on the Order page in your Dashboard. This may apply to the following order types:
- Collection
- Import to Inventory (with Pickup)
- Collect for Maintenance
- Swap by Purchase
- Swap by Assign
- Offboarding
Details about failed attempts are covered in the terms and conditions for the order request. Note that each failed attempt will be an added charge to the order.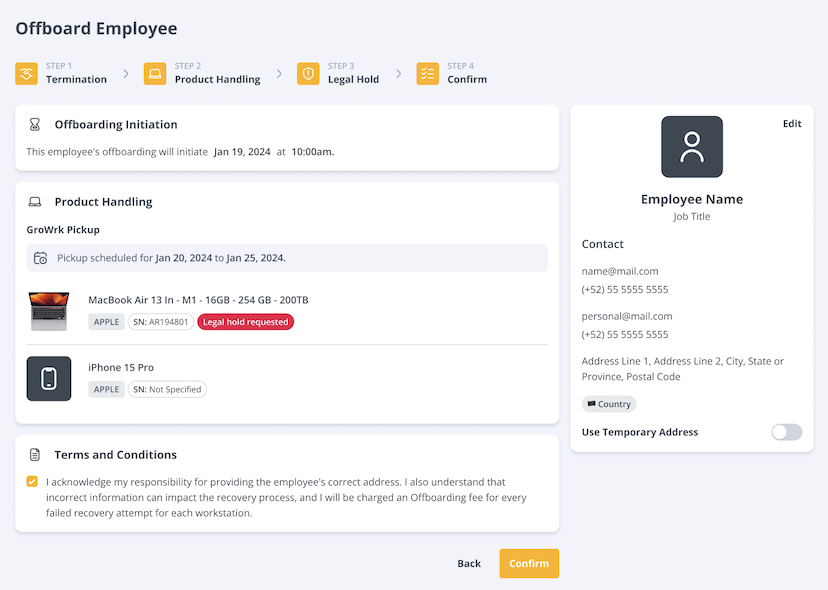
Power Accessories
Power accessory statuses
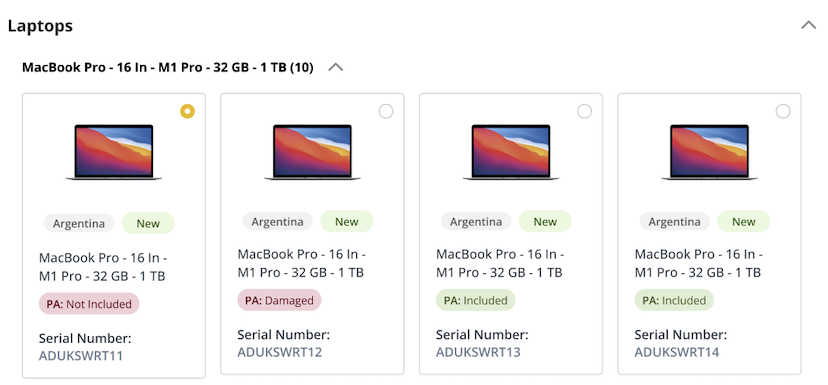
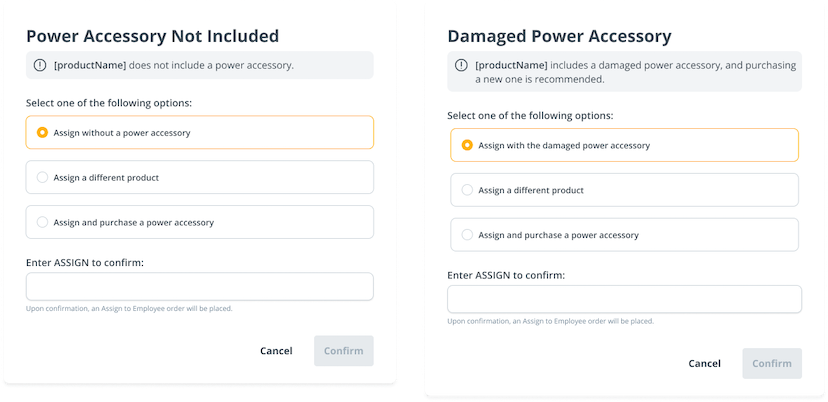
When selecting products to assign to employees, statuses will be displayed to indicate whether a power accessory is included, damaged, or not included with the product.
When assigning products through an employee’s profile, power accessory statuses will be displayed for available products.
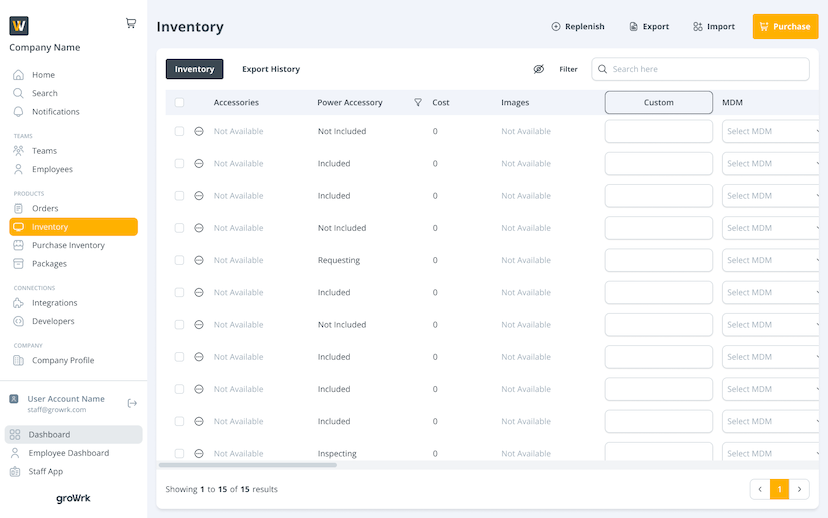
In the Inventory, power accessory statuses will be displayed in the Power Accessory column.
In the Swap by Assign flow, power accessory statuses will be displayed for available products.
Products with missing or damaged power accessories
The following flows apply to Assign to Employee and Swap by Assign order types.
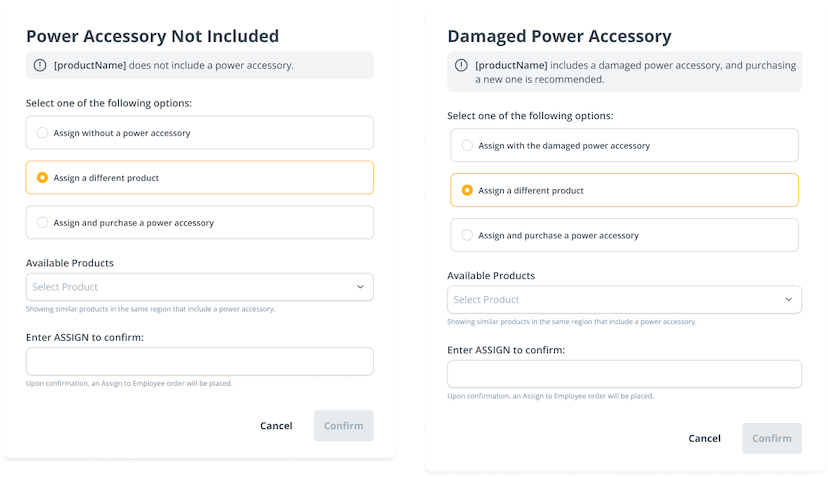
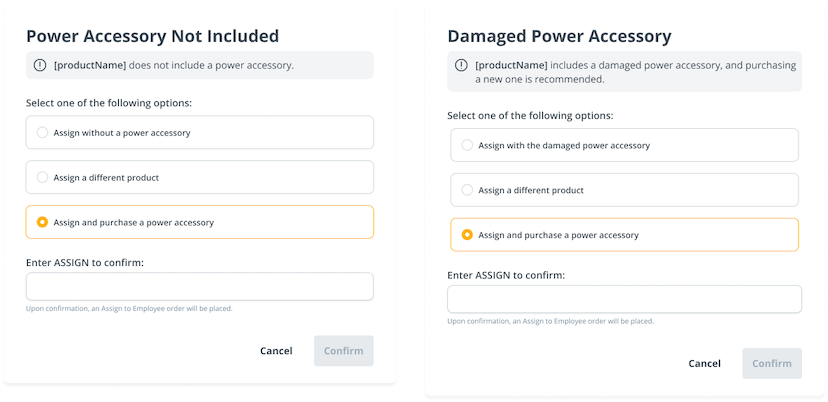
When assigning a product without a power accessory or with a damaged one, a popup will prompt you to choose how to proceed. You can: Assign without a power accessory, Assign a different product, or Assign and purchase a power accessory.
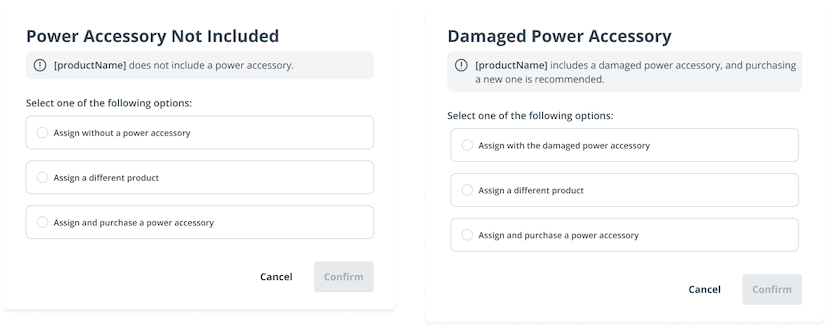
Assign without a power accessory or with the damaged power accessory
By selecting this option, the order proceeds as is. The product will be sent to the employee without a power accessory or with the damaged power accessory. Enter ASSIGN and select Confirm to place the order.
Assign a different product
This option allows you to select from a list of available products that include a power accessory. Select a product, enter ASSIGN, and select Confirm to place the order.
Assign and purchase a power accessory
This option allows you to assign the selected product and purchase a new power accessory. The power accessory may ship separately from the device based on processing times. Enter ASSIGN and select Confirm to place the order.
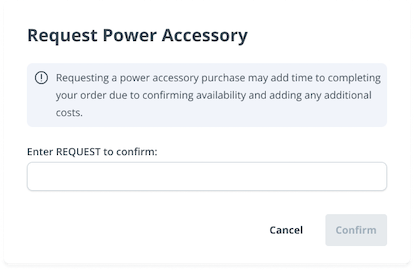
Request a power accessory purchase
The following may apply to the following order types: Collect for Maintenance, Import Inventory (Self-Delivery), Import Inventory (with Recovery), Swap by Purchase, Swap by Assign, and Offboarding.
If a product arrives at the warehouse missing its power accessory or with a damaged one, you will be notified. If you wish to request to purchase a new power accessory, you can do so through the order page.

Enter REQUEST and select Confirm. The request will be reviewed and added to the order.
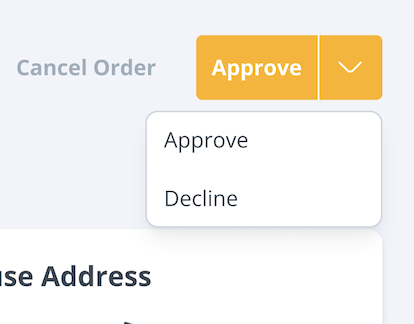
Approve power accessory pricing
The power accessory will be priced and added to the order page. To proceed, select Approve at the top right corner.
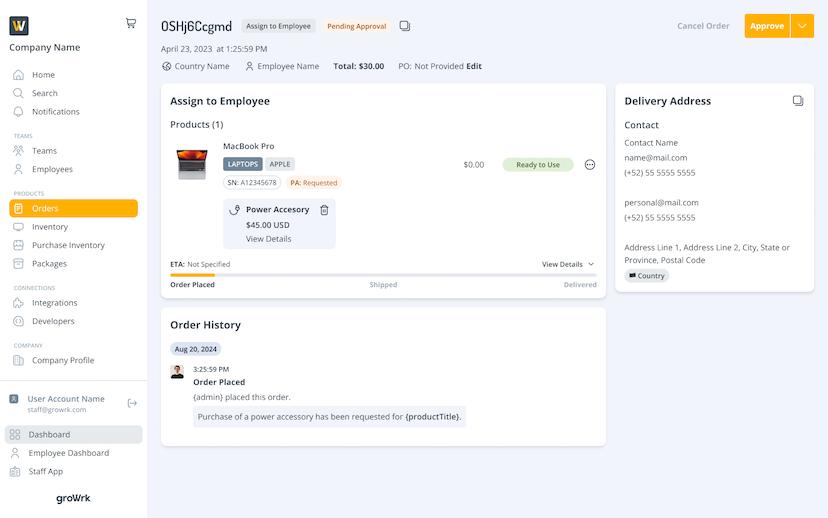
To decline the order, select the dropdown and select Decline. Declining will only cancel the purchase request.
End of Lifecycle
There are four possible End of Lifecycle order types:
Buyback: The Laptop Buyback Program at GroWrk facilitates the sale of old or surplus laptops, offering businesses credit in exchange. This program provides a cost-effective and responsible solution for managing outdated equipment. Secure data wiping is included, and a certificate of data destruction is provided if applicable.
Destruction: GroWrk’s Destruction Service offers secure and thorough destruction of IT devices to ensure complete data elimination. This includes physical destruction of devices like hard drives or motherboards to prevent data breaches. In some countries, complete device destruction is available. The service includes a certificate of destruction and data wiping.
Donation: GroWrk’s Donation Program allows companies to support causes or communities by donating old IT equipment. Devices are repurposed to benefit charitable organizations, with Growrk managing the logistics and issuing certificates to acknowledge the donation. This program includes secure data wiping to protect sensitive information.
Recycle: GroWrk’s Recycling Service ensures IT equipment is recycled responsibly, adhering to strict environmental standards. This service involves proper processing of materials and secure data erasure. A recycling certificate and data destruction confirmation are provided to support environmental sustainability.
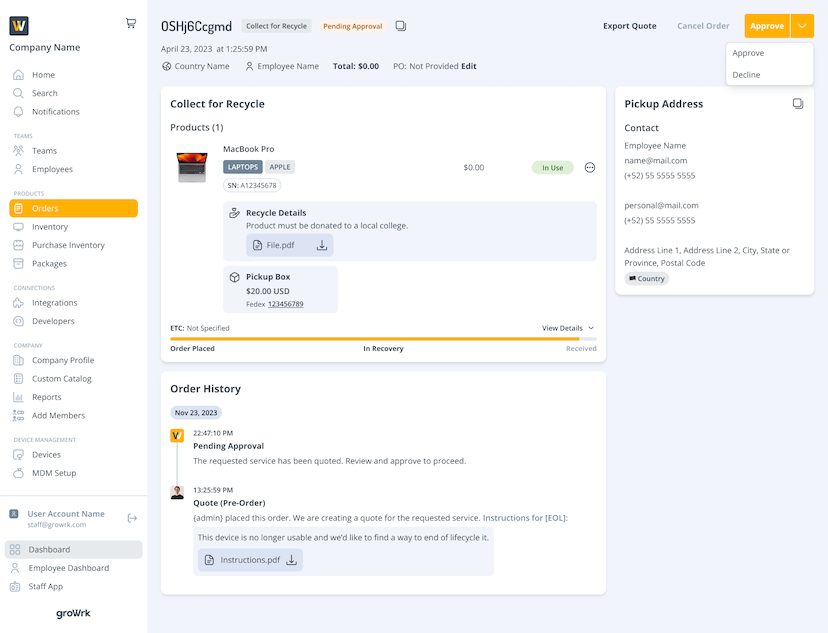
Request End of Lifecycle services
There are two entry points to request End of Lifecycle orders: Inventory (for assigned or stored products) and the Employee Profile (for assigned products).
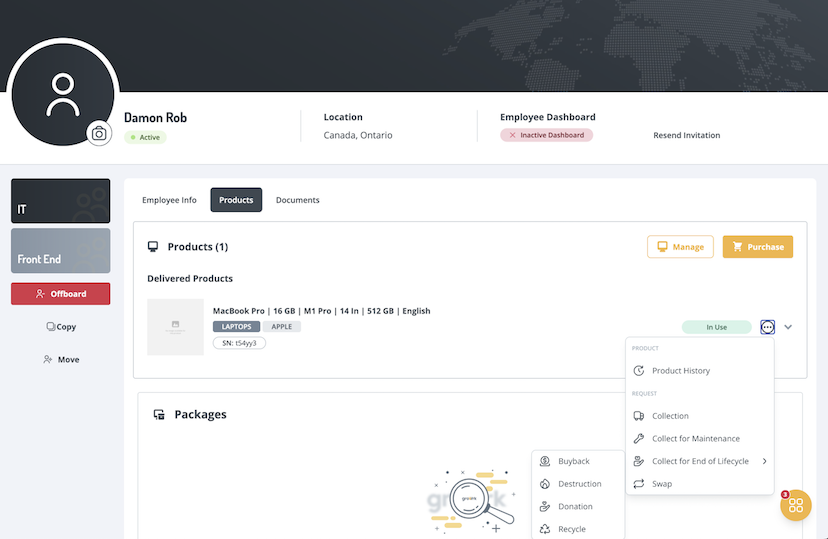
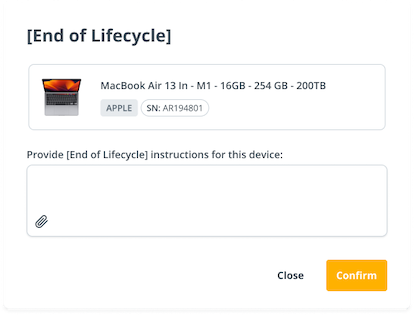
- In your Inventory, select the menu icon of a product. In the dropdown, hover over Collect for End of Lifecycle (if the product is currently assigned) or End of Lifecycle (if the product is unassigned and stored in inventory). Select one of the four order options.
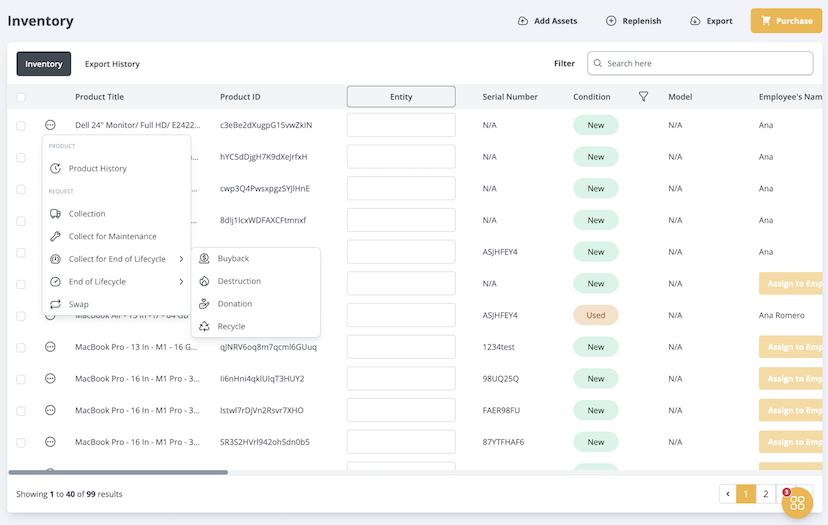
Or in the Employee Profile, select Manage. In the dropdown, hover over Collect for End of Lifecycle. Select one of the four order options.
- Prior to an End of Lifecycle request being made, the title of the device must be officially transferred over to GroWrk. The following modal lists the terms that will be applied once the transfer is confirmed.
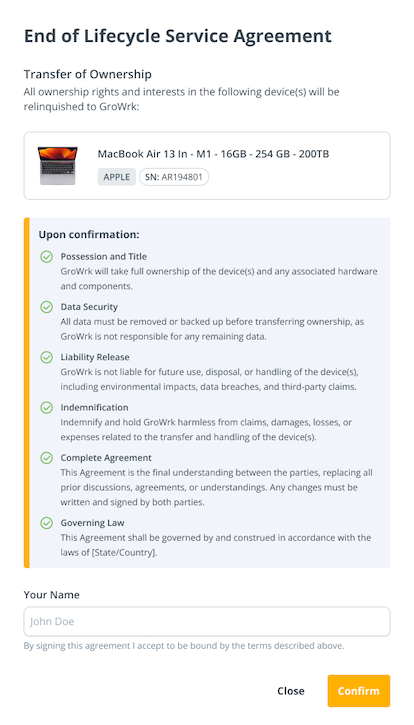
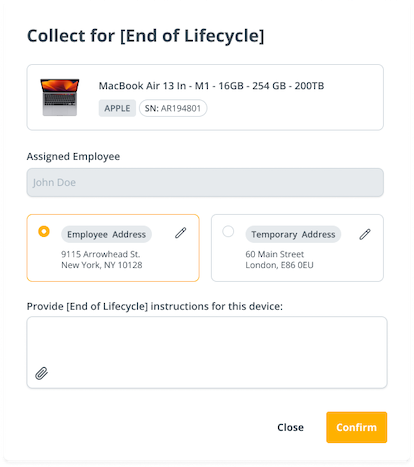
- A modal will appear to confirm the request. Enter any instructions regarding the collection and select Confirm. If the device is currently unassigned and stored in your inventory, employee information will not be displayed on the modal.
Approve order
- Once requested, the order will be in the Quote (Pre-Order) status until GroWrk staff reviews and provides a quote for the order.
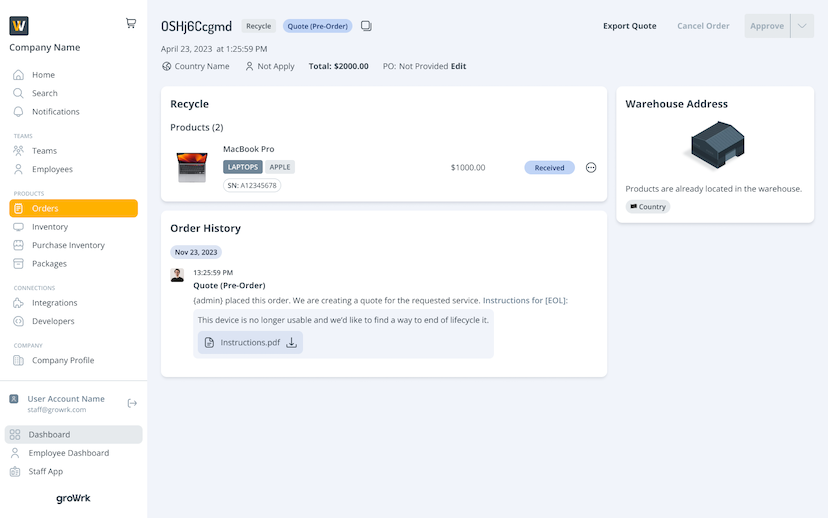
- The status will change to Pending Approval when GroWrk staff updates the order with the total price.

- Select the Approve button at the top right corner, or use the dropdown to select Decline.
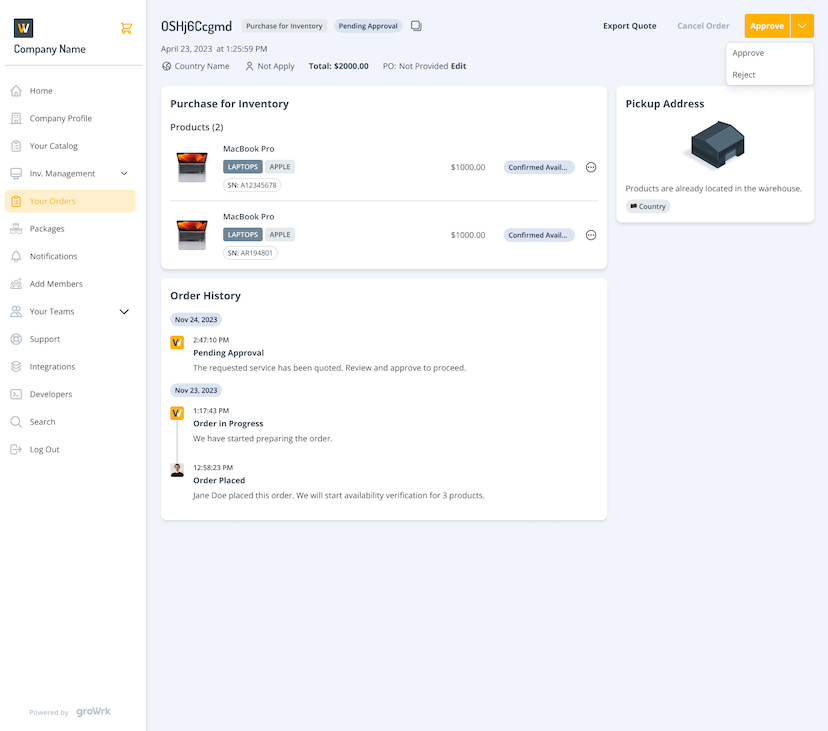
Approve or reject pending orders
Quoted orders
When quoted orders are ready to be reviewed, they will be set to Pending Approval. These orders must be reviewed before proceeding. This process may apply to Purchase for Employee, Purchase for Inventory, and Maintenance order types.
- When an order is in the Pending Approval status, there will be an Approve button on the top right corner.
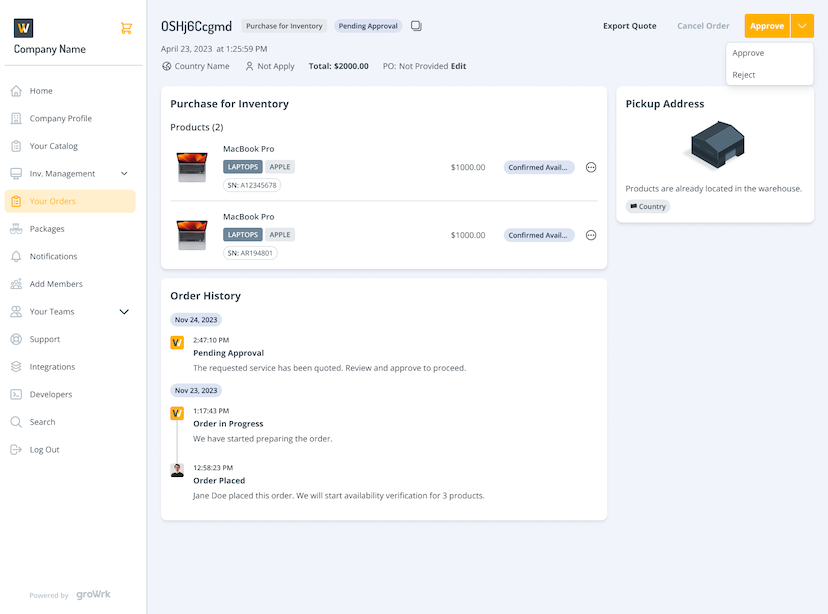
- Select Approve, and you’ll be notified that the order will proceed.
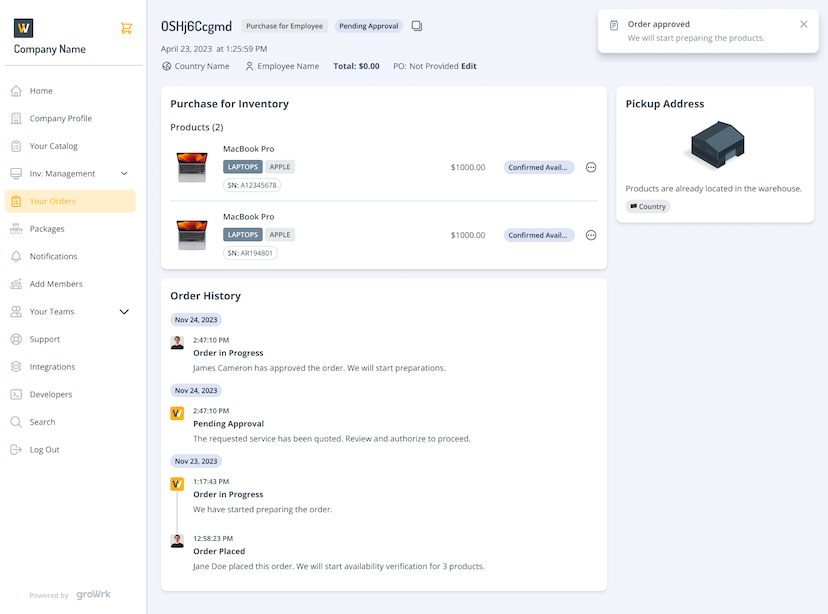
Product replacements and price changes
When product replacements or price changes are ready to be reviewed and approved, the order will be set to Pending Approval. This may apply to the following order types:
- Purchase for Employee
- Purchase for Inventory
- Assign to Employee
- Swap by Assign
- Swap by Purchase
Note: Assign to Employee and Swap by Assign order types will have product replacements from available products in the inventory.
- The product replacement suggestion will be displayed beneath the unavailable product in the Order page. The price will be displayed alongside it.
- To approve the product replacement, select Approve in the top right corner. You will be notified that the order will proceed.
Rejecting orders
To reject any orders that are marked as Pending Approval, select the icon to the right of the Approve button. There will be a dropdown with the option to select Reject.